
Make skin look perfect in one-click with these AI-powered Photoshop actions.

Step 21
Change this layer to Soft Light

Step 22
Create a New layer make sure that it is the top layer. Fill it in with black #000000 then make sure the layer Fill is at 0% an add this layer style.

Step 23
Now here comes the time consuming part. Drag over your honeycombs and duplicate them however many times you need and line them up as so. Note: Don't forget to create gaps in the honeycomb.


Step 24
Now it is best for you to merge the clusters that are connected to one another. In my case I will have 3 different layers of honeycombs. Now we will add a drop shadow to the honeycombs. Use this drop shadow for all of the honeycomb layers.

Step 25
Your honeycombs should look like this

Step 26 Text Effect
Now we will create the honey text. When I create my text I usually like to start it in a new document. So create a New document. It doesn't really matter what size. The text I will be using is BorisBlackBloxx with a size of 155 pt and a color of #f5d610. Make sure you have clicked the Bold button.

Step 27 Layer Styles
Duplicate this layer three times. On the first layer add these layer styles.


Step 28
On the second layer add these layer styles. Move this layer 5 times to the left


Step 29
Also move this layer 5 times to the left and add these layer styles


Step 30
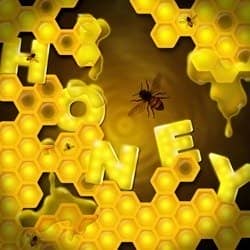
This is how your text should look so far

Step 31
Next we will add the glowing lights, create a new layer and grab your paint brush tool (#FFFFFF 22px soft round brush) and align the circles throughout the letter.

Step 32
Change this layer to Overlay

Step 33
Now we will add some highlights and darken some areas. Create a new layer and active the selection from one of the letters. You can do this by clicking the image on the layer while pressing the ctrl button.

Step 34
Now with a 35px soft round brush #FFFFFF (Paint Brush Tool) and paint on the outer top left edges of your letter like I did.

Step 35
Change this layer to Overlay

Step 36
Create a new layer and 6px soft round brush #FFFFFF and paint in some highlights like the image below

Step 37
Filter>Blur>Gaussian Blur of 2.9 pixels

Step 38
Change the Opacity of this layer to 59%

Step 39
Now lets darken some areas. Grab your paint brush tool (22px soft round brush #987b02) and darken in some areas on the letter.
One comment on “Create a Honeycomb Artwork in Photoshop”
really awesome except for the honey drips which are a bit too lumpy for actual honey.