
Turn any photo into a dot grid artwork with these Photoshop actions. You'll get great results with dots that change size. They get larger in brighter areas and smaller in darker areas. Free download available.
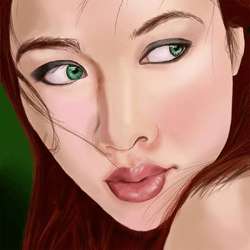
Begin with the top lip*, outlining the outer edge and then filling it in. Then take the same size brush and outline the bottom lip with color # B15A5C. Then use the eyedropper tool to pick up the upper lip color and fill in the bottom lip with this color (#CA7072).

{articlead}
*color # CA7072, 35 pixel brush, 100% opacity, hard edged brush, pen pressure must be turned on
Step 29
Use color # 762A2C to outline* the darkest parts of the bottom lip. This color will be mostly concentrated on the left side and between the lips.

*14 pixel brush, 38% opacity, hard edged brush
Step 30
Using the same brush as before, block in the shadow areas on the lips with color # B35E5F.

Step 31
Again using the same brush, take color # DA999A and indicate the highlights on the lips. You can then take the dodge tool (set to highlight mode) to brighten the highlights.

Step 32
Now for the finishing the lips use the burn tool* to darken the darkest parts of the lips. Again like when we were lining them, it will be mainly concentrated on the left side.
If you wish to add lines to the lips, use the burn tool again, this time set to 11% exposure and switching between brush sizes 14 pixels and 5 pixels. This will allow for realistic and more detailed lips.

*32 pixels, 55% exposure, midtones mode, soft round brush
Step 33
The last thing we have to do with the lips is integrate them into the face. Without this, they will appear to be pasted one, and have no depth. It will also require another layer titled “mouth” above the “lips” layer.
To begin, use color # DB8779 to define the little dip above the mouth*. The best way I have found to do this is in tens of layers. This will allow you to build up the area around the lips and create a soft edge. Using the same color and brush, work your way around the mouth concentrating the color on the left side of the mouth, and in a little hook shape at the right corner.
To finish off the little “hook”, take the burn tool (62% exposure, midtones mode, 35 pixels soft brush) and darken it until it is the same darkness as the crease between the lips.
7 comments on “Create a Painting from a Portrait Photograph”
gr8 tutorials thanxxx
Please uninstall Photoshop and NEVER use it again.
@Dan Bolivar, Delete your browser, eat a happy pill and go climb a tree. Troll.
Thank you for tutorials.
can i make this without using graphic tablet
Can I use Photoshop 6 to make this...if not, why??
nice tut thanks for sharing