
Luminar AI lets you turn your ideas into reality with powerful, intelligent AI. Download the photo editor and see how you can completely transform your photos in a few clicks.
This tutorial describes how to create a photo-realistic rendering of a car, in this case an Audi A1. This tutorial relies heavily on paths and should take about two hours to complete depending on skill level.
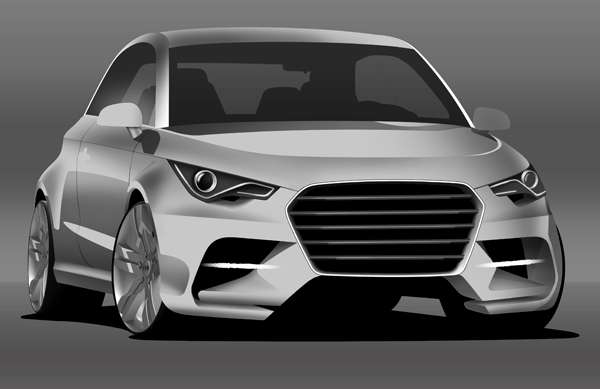
Preview of Final Results

Tutorial Resources
- Wheels - Designermart
Step 1
Begin by sketching your design. The line work doesn't have to be the best as you will go over it all using paths. Try to include as much detail as you but don't worry too much, the point of this is to develop a design as well so its a good thing if ideas come to you as you work. Scan the sketch and save your file. This particular file is 3500 pix wide if you’re working with anything considerably larger or smaller your results will be different due to brush sizes.

Step 2
Start by redrawing the lines using paths then hide the layer with the original sketch and on a new layer stroke the paths using a brush 1px wide. Rename this layer to 'lines'.

Step 3
Using the magic wand tool select the areas which represent the main bodywork/metal areas. On a new layer use the paint bucket tool to fill in these areas.

Step 4
Using the same method as in Step 3 fill in the rest of the car putting each area on a different layer.

Step 5
On a new layer use the gradient tool to create a background gradient.

Step 6
Download some wheels from designermart.co.uk. Extract the angles suitable for your design and position them.

Step 7
Fill in the areas which are in shadow or shade. At this stage don't worry about the gradient of these areas.

Step 8
Select the eraser tool and set it to Soft Round Pressure Opacity then start to erase the top areas of the shadowed areas. The premise here is that the higher areas are closer to the light so the shadows are lighter.

Step 9
On a new layer add a gradient coming in from the right hand side of the car and a little dark areas on the roof.

Step 10
Erase parts of the gradient from the right as shown.

Step 11
Add a little shadow coming down from the beltline to give the side of the car some shape.

Step 12
Add some more shade to area above the beltline and the hood to give the areas some depth and shape.

Step 13
Add some shade to the wheel arches and areas underneath the lights.
4 comments on “How to Create an Audi A1 Digital Car Painting in Photoshop”
idolo!!!
wooooow vrey nice مررره مينوووونه لعيون فطووومه i am speki arabi خلاص
see you
I love me ,, pless
Question about step 8. Set it "soft round pressure opacity". What the heck does that mean? Could you be a little more specific, please?
unbelievable man. It looks like a illustrated photo.
very helpful. thanks..