
Make your artwork look like they're from an alternate universe. These Cyberpunk presets work with Photoshop (via the Camera Raw filter) and Lightroom. Download all 788 presets for 90% off.
![step 33a[5]](https://cdn.photoshoptutorials.ws/images/stories/5cde552890ea_ED74/step33a5.png?strip=all&lossy=1&quality=70&webp=70&avif=70&w=1920&ssl=1 "step 33a[5]")
![step 33b[5]](https://cdn.photoshoptutorials.ws/images/stories/5cde552890ea_ED74/step33b5.png?strip=all&lossy=1&quality=70&webp=70&avif=70&w=1920&ssl=1 "step 33b[5]")
Step 34
Create a new layer (Ctrl +Shift + N). Using pen tool (P) create a new path shape (step 34a). Set the brush tool (B) on 2px and white color (#ffffff). Stroke the path by using right click options of pen tool (P). Set the stroke on brush with simulate pressure on (step 34b). Set the layer on Overlay from the Layer menu window (step 34c).
![step 34a[5]](https://cdn.photoshoptutorials.ws/images/stories/5cde552890ea_ED74/step34a5.png?strip=all&lossy=1&quality=70&webp=70&avif=70&w=1920&ssl=1 "step 34a[5]")
![step 34b[5]](https://cdn.photoshoptutorials.ws/images/stories/5cde552890ea_ED74/step34b5.png?strip=all&lossy=1&quality=70&webp=70&avif=70&w=1920&ssl=1 "step 34b[5]")
![step 34c[5]](https://cdn.photoshoptutorials.ws/images/stories/5cde552890ea_ED74/step34c5.png?strip=all&lossy=1&quality=70&webp=70&avif=70&w=1920&ssl=1 "step 34c[5]")
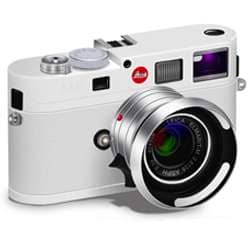
Step 35
Create a new layer (Ctrl +Shift + N). Using pen tool (P) create a new path (step 35a). Set the brush tool (B) on 2px and white color (#ffffff). Stroke the path by using right click options of pen tool (P). Set the stroke on brush with simulate pressure off (step 35b). Make a new layer (Ctrl + Shift + N) and select from the right click option “Fill path… ”. Fill the path with black color (#000000) (step 35c).
![step 35a[5]](https://cdn.photoshoptutorials.ws/images/stories/5cde552890ea_ED74/step35a5.png?strip=all&lossy=1&quality=70&webp=70&avif=70&w=1920&ssl=1 "step 35a[5]")
![step 35b[5]](https://cdn.photoshoptutorials.ws/images/stories/5cde552890ea_ED74/step35b5.png?strip=all&lossy=1&quality=70&webp=70&avif=70&w=1920&ssl=1 "step 35b[5]")
![step 35c[5]](https://cdn.photoshoptutorials.ws/images/stories/5cde552890ea_ED74/step35c5.png?strip=all&lossy=1&quality=70&webp=70&avif=70&w=1920&ssl=1 "step 35c[5]")
Step 36
Create a new layer (Ctrl +Shift + N). Using pen tool (P) create a new path (step 36a). Set the brush tool (B) on 2px and color (#49494a). Stroke the path by using right click options of pen tool (P). Set the stroke on brush with simulate pressure on (step 36b). Make a new layer (Ctrl + Shift + N) and stroke again but this time with white color (#ffffff) (step 36c).
![step 36a[5]](https://cdn.photoshoptutorials.ws/images/stories/5cde552890ea_ED74/step36a5.png?strip=all&lossy=1&quality=70&webp=70&avif=70&w=1920&ssl=1 "step 36a[5]")
![step 36b[5]](https://cdn.photoshoptutorials.ws/images/stories/5cde552890ea_ED74/step36b5.png?strip=all&lossy=1&quality=70&webp=70&avif=70&w=1920&ssl=1 "step 36b[5]")
![step 36c[5]](https://cdn.photoshoptutorials.ws/images/stories/5cde552890ea_ED74/step36c5.png?strip=all&lossy=1&quality=70&webp=70&avif=70&w=1920&ssl=1 "step 36c[5]")
Step 37
Create a new layer (Ctrl +Shift + N). Using pen tool (P) create a new path (step 37a). Set the brush tool (B) on 2px and white color (#ffffff). Stroke the path by using right click options of pen tool (P). Set the stroke on brush with simulate pressure off (step 37b). Make a new layer (Ctrl + Shift + N) and select from the right click option “Fill… ”. Fill the selection with color (#000000) (step 37c).
![step 37a[5]](https://cdn.photoshoptutorials.ws/images/stories/5cde552890ea_ED74/step37a5.png?strip=all&lossy=1&quality=70&webp=70&avif=70&w=1920&ssl=1 "step 37a[5]")
![step 37b[5]](https://cdn.photoshoptutorials.ws/images/stories/5cde552890ea_ED74/step37b5.png?strip=all&lossy=1&quality=70&webp=70&avif=70&w=1920&ssl=1 "step 37b[5]")
![step 37c[5]](https://cdn.photoshoptutorials.ws/images/stories/5cde552890ea_ED74/step37c5.png?strip=all&lossy=1&quality=70&webp=70&avif=70&w=1920&ssl=1 "step 37c[5]")
Step 38
Create a new layer (Ctrl +Shift + N). Using pen tool (P) create 2 new paths (step 38a). Set the brush tool (B) on 2px and white color (#ffffff). Stroke the path by using right click options of pen tool (P). Set the stroke on brush with simulate pressure off (step 38b). Make a new layer (Ctrl + Shift + N) and stroke again but this time with Simulate pressure option on (step 38c).
![step 38a[5]](https://cdn.photoshoptutorials.ws/images/stories/5cde552890ea_ED74/step38a5.png?strip=all&lossy=1&quality=70&webp=70&avif=70&w=1920&ssl=1 "step 38a[5]")
![step 38b[5]](https://cdn.photoshoptutorials.ws/images/stories/5cde552890ea_ED74/step38b5.png?strip=all&lossy=1&quality=70&webp=70&avif=70&w=1920&ssl=1 "step 38b[5]")
![step 38c[5]](https://cdn.photoshoptutorials.ws/images/stories/5cde552890ea_ED74/step38c5.png?strip=all&lossy=1&quality=70&webp=70&avif=70&w=1920&ssl=1 "step 38c[5]")
Step 39
Create a new layer (Ctrl +Shift + N). Using pen tool (P) create 2 new paths (step 39a). Set the brush tool (B) on 1px and white color (#ffffff). Stroke the path by using right click options of pen tool (P). Set the stroke on brush with simulate pressure off (step 39b).
4 comments on “Render a High Detail Leica M8 Camera with Photoshop”
Step 1: Draw a camera with the pen tool
:O/
+1 LOL
This is so good. I am impressed
That is some impressive PS work!