
Turn any photo into a dot grid artwork with these Photoshop actions. You'll get great results with dots that change size. They get larger in brighter areas and smaller in darker areas. Free download available.
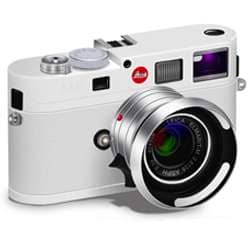
Learn how to recreate this stunning image of a limited edition white Leica M8. This is a very lengthy Photoshop tutorial that will show you every step of the process. A PSD with 186 layers is included at the end of the tutorial.
Preview of Final Results

Render a High Detail Leica M8 Camera Photoshop Tutorial
Resources
- New York Skyline - Dreamstime
- Watercolor Splatters Photoshop Brushes - Photoshop Tutorials
- Water Background - knightfall-stock
Step 1
Create a new image document by using the File menu and selecting “New...” (Ctrl + N). Set a custom preset, width at 800px and the height at 600px, resolution: 300px/inch .
![step 1[11]](https://cdn.photoshoptutorials.ws/images/stories/5cde552890ea_ED74/step111.png?strip=all&lossy=1&quality=70&webp=70&avif=70&w=1920&ssl=1 "step 1[11]")
Step 2
Create a new layer (Ctrl +Shift + N). Using pen tool (P) create the shape of the camera (step2a). Select from the right click pen tool (P) options the “Fill path… ” option. Fill the path with grey color (#e4e4e4) (step2b).
![step 2a[7]](https://cdn.photoshoptutorials.ws/images/stories/5cde552890ea_ED74/step2a7.png?strip=all&lossy=1&quality=70&webp=70&avif=70&w=1920&ssl=1 "step 2a[7]")
![step 2b[7]](https://cdn.photoshoptutorials.ws/images/stories/5cde552890ea_ED74/step2b7.png?strip=all&lossy=1&quality=70&webp=70&avif=70&w=1920&ssl=1 "step 2b[7]")
Step 3
Create a new layer (Ctrl +Shift + N). Using pen tool (P) create a path shape. From the right click options select “Make selection…”. Set the Feather Radius on 0.3px (step3a). Brush (B) the selections with (#d4d4d4). Use the brush settings like in the picture: master diameter 50px, hardness 100%, opacity and flow 100%, mode: normal (step 3b). Set the Layer Style on Gradient Overlay like this: blend mode: normal, opacity: 65%, gradient on reverse, linear style, an angle of 145°, scale 100% (step 3c).
![step 3a[7]](https://cdn.photoshoptutorials.ws/images/stories/5cde552890ea_ED74/step3a7.png?strip=all&lossy=1&quality=70&webp=70&avif=70&w=1920&ssl=1 "step 3a[7]")
![step 3b[7]](https://cdn.photoshoptutorials.ws/images/stories/5cde552890ea_ED74/step3b7.png?strip=all&lossy=1&quality=70&webp=70&avif=70&w=1920&ssl=1 "step 3b[7]")
![step 3c[7]](https://cdn.photoshoptutorials.ws/images/stories/5cde552890ea_ED74/step3c7.png?strip=all&lossy=1&quality=70&webp=70&avif=70&w=1920&ssl=1 "step 3c[7]")
Step 4
Create a new layer (Ctrl +Shift + N). Using pen tool (P) create a path shape. From the right click options select “Make selection…”. Set the Feather Radius on 0.3px (step4a). Brush (B) the selections with (#d4d4d4). Use the brush settings like in the picture: master diameter 50px, hardness 100%, opacity and flow 100%, mode: normal (step 4b). Set the Layer Style on Gradient Overlay like this: blend mode: normal, opacity: 100%, linear style, an angle of -24°, scale 121% (step 4c).
![step 4a[7]](https://cdn.photoshoptutorials.ws/images/stories/5cde552890ea_ED74/step4a7.png?strip=all&lossy=1&quality=70&webp=70&avif=70&w=1920&ssl=1 "step 4a[7]")
![step 4b[7]](https://cdn.photoshoptutorials.ws/images/stories/5cde552890ea_ED74/step4b7.png?strip=all&lossy=1&quality=70&webp=70&avif=70&w=1920&ssl=1 "step 4b[7]")
![step 4c[7]](https://cdn.photoshoptutorials.ws/images/stories/5cde552890ea_ED74/step4c7.png?strip=all&lossy=1&quality=70&webp=70&avif=70&w=1920&ssl=1 "step 4c[7]")
Step 5
Create a new layer (Ctrl +Shift + N). Using pen tool (P) create a path shape. From the right click options select “Make selection…”. Set the Feather Radius on 0.3px (step5a). Brush (B) the selections with white (#ffffff). Use the brush settings like in the picture: master diameter 50px, hardness 100%, opacity and flow 100%, mode: normal (step 5b).
![step 5a[7]](https://cdn.photoshoptutorials.ws/images/stories/5cde552890ea_ED74/step5a7.png?strip=all&lossy=1&quality=70&webp=70&avif=70&w=1920&ssl=1 "step 5a[7]")
![step 5b[7]](https://cdn.photoshoptutorials.ws/images/stories/5cde552890ea_ED74/step5b7.png?strip=all&lossy=1&quality=70&webp=70&avif=70&w=1920&ssl=1 "step 5b[7]")
Step 6
Create a new layer (Ctrl +Shift + N). Using pen tool (P) create a new path. Set the brush tool (B) on 2px and white color (#ffffff). Stroke the path by using right click options of pen tool (P). Set the stroke on brush with simulate pressure off (step 6a). Make a new layer (Ctrl + Shift + N) and from the right click options select “Make selection…”. Set the Feather Radius on 0.3px (step6b). Brush (B) the selections with (#343327). Use the brush settings like in the picture: master diameter 50px, hardness 100%, opacity and flow 100%, mode: normal (step 6c).
4 comments on “Render a High Detail Leica M8 Camera with Photoshop”
Step 1: Draw a camera with the pen tool
:O/
+1 LOL
This is so good. I am impressed
That is some impressive PS work!