
Turn any photo into a dot grid artwork with these Photoshop actions. You'll get great results with dots that change size. They get larger in brighter areas and smaller in darker areas. Free download available.

Step 20
To begin the leaf, make a soft curve that turns at the end and goes further than the end of the first lines we drew (comes to a point there).

Step 21
Finish blocking it in by adding the second half of the palm leaf. This looks much like a backwards “L” shape that curves a little to the right.

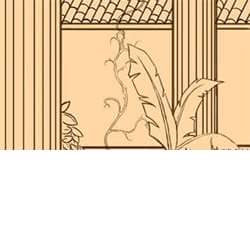
Step 22
Erase small portions of the outline, and then make multiple “V” shapes across the leaves. This will give the impression of the many little leaves that make up palm branches.

Step 23
Copy steps 18-22 to make a few other leaves.

Step 24
Begin to sharpen the edges on the pot, plant, columns, floor, and ceiling. This can be done using the same brush, and an eraser set to 100% opacity (hard edged round brush).

Step 25
Now it is time to add some leaves to the bush and trees. To make these leaves, a simple pointed oval shape with a line beginning at the base will do perfectly.

Step 26
Add detail to the bush by outlining individual leaves and cleaning up the outline.

Step 27
Use the same method to add detail to the trees outside.

Step 28
Make a new layer above the sketch. This layer will be merged down later.

Step 29
To begin the tiles on the roof, make multiple rows of slanted horizontal lines running across the roof.
For this part it is best to turn off shape dynamics, and work with a brush set to 85% opacity.

Step 30
Add rounded tops, and arches for the bottom.

Step 31
The last step is to add individual tiles to the roof. This can be done by using the same “arches” for the bottom of the rows.
I preferred to place them so that they did not form rows, but one tile ended around the middle of the adjacent tiles.

Step 32
Erase the top of the roof from the “sketch” layer.

Step 33
Merge the layer down so that the roof is back on the sketch layer.

Step 34
Make a new layer and name it “vine”.

Step 35
Using the same brush as the roof (this time with shape dynamics back on) create a “shell” for the vine by outlining both sides.

Step 36
Erase the vine from the layer below, being careful not to erase the other important lines.

Step 37
Make a new layer below the vine and leave it. It will be merged down later.

Step 38
Using the same method as before for creating vertical lines, begin adding lines to the columns. They should be closer together towards the edges, and further apart as they near the middle.
One comment on “Roman House Painting Part I - The Drawing”
This looks very interesting