
Turn any photo into a dot grid artwork with these Photoshop actions. You'll get great results with dots that change size. They get larger in brighter areas and smaller in darker areas. Free download available.
Create a beautiful painting of an aquarium in Photoshop. This detailed tutorial is the second part of the Seascape Painting series. Part II will teach you how to draw the fishes and add a finishing touch to the image.
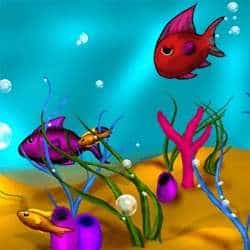
Preview of Final Results

Seascape Painting Part II: Creating the Fish and Finishing the Picture Photoshop Tutorial
- Program: Photoshop 7
- Difficulty: Beginner
- Estimated Completion Time: 40 minutes
*This tutorial was meant to be completed using a pen tablet. If you are using a mouse, the brush sizes will be irrelevant. However, a good estimate for brush sizes when using a mouse is about 1/3 the size of the brush I am using.
Step 1
Make a new layer above layer “coral 3”.

Step 2
Use color #23001A to make a football shape (using a 70 pixel opaque brush).

Step 3
Make a connected crescent moon shape attached to the back of the football shape.

Step 4
Outline the fish in color #150600 using a 15 pixel brush.

Step 5
Use the burn tool (shadow mode, 15% exposure, 133 pixel brush) to add shadows to the figure, mostly along the bottom.

Step 6
Set the burn tool to midtones mode (exposure 64%) and add a shadow area to the top of the fish and along its tail.

Step 7
Use the dodge tool (118 pixel soft edged brush, 20% exposure, midtones mode) to highlight the fish’s body.

Step 8
Go to Image à Adjustments à Levels and change the levels.
Input Levels: 0, 1.78, 118
Output Levels: 0, 255


Step 9
Make a new layer above the “fish” layer and title it “scales”.

Step 10
Go to Edit à Fill and set it to 50% Gray.


Step 11
Now make a new layer above this layer, you can leave it untitled because it will eventually be merged onto the “scales” layer.

Step 12
Using color #150600 make three little backwards “C” shapes.

Step 13
Copy and paste this layer until you have a little bar of the C shapes.

Step 14
Now merge the layers down until they are all on one layer (right above layer “scales”).

Step 15
Copy and paste this layer into two long rows.

Step 16
Merge the layers down onto the “scales” layer.

Step 17
Change the layer mode to “soft light”. This will make semi-transparent scales.


Step 18
Move the scales so that they cover the entire fish shape.

Step 19
Erase all the scales that fall outside the shape.


Step 20
Make a new layer below the “fish” layer titled “fins”.

Step 21
Block In the top fin with color #EB00D8.

Step 22
Use the burn tool (highlights mode, 34% exposure) to add shadows to the fin.