
Luminar AI lets you turn your ideas into reality with powerful, intelligent AI. Download the photo editor and see how you can completely transform your photos in a few clicks.
- Brush size: 700px
- Hardness: 0%
- Opacity: 45%
- Flow: 100%
Before we paint though, we would need to set the Brush’s color, to do that click on the Foreground Color on the Tools window. See image below:

When that box opens, it would look like this:

Now we’re all set to paint in some light! See image below on how to do it:

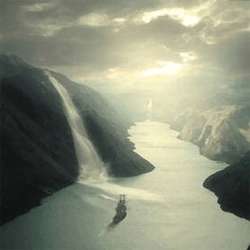
The result should be similar to the image shown below:

When you’re done, select all the layers that you’ve created and the press Ctrl/Cmd + G to group the layers. You’d notice that a folder will be created; to see the layers, simply click on the drop-down button. Rename this Group to “Background”.
Note: Renaming a group is similar to renaming a layer.

Step 3: Create the Waterfalls
Now in this step, we will be adding the waterfalls. To do that, we will need to create a new layer first (Ctrl/Cmd + Shift + N) and name this new layer: “Waterfall 1”.
With that done, activate the Brush tool (B) and then open the Brush pack: “Waterfalls” by midnightstouch – before everything else, make sure that you have downloaded these brushes on the Photoshop Brushes directory (Adobe Photoshop > Presets > Brushes).
Now to open it, right click on the canvas while the Brush tool (B) is activated and then click on the drop-down menu to show the advanced Brush’s options. See image below:

Next, we will need to Load the brushes from the directory where we saved it.

Use the following Brush:

Once loaded, use the following settings for the Brush tool (B).
- Brush size: 100px
- Hardness: Default
- Opacity: 100%
- Flow: 100%
- Use the following for the Brush’s color:
- #: ffffff
Apply the Brush on the area shown below:


Next, let’s create another layer (Ctrl/Cmd + Shift + N) but this time name it as “Waterfall 2”. We will still be using the “Waterfalls” brushes by midnightstouch so do not Reset your brushes just yet. Right click on the canvas using the Brush tool (B) and pick the following brush:

Once that Brush is active, use the following settings for the Brush tool (B).
- Brush size: 700px
- Hardness: Default
- Opacity: 100%
- Flow: 100%
- #: ffffff
Apply the Brush on the area shown on the image below:

Now to make this waterfall look real, we’re going to remove the unwanted parts. To do that, we’re going to need the Eraser tool (E). Activate this tool and then use the following settings:
4 comments on “Create a Beautiful River Scenery in Photoshop”
nice :D
lovely~
the river photo on deviant arts, several links are the exact photo here, very popular tutorial, thanks!
stockimage 10 isn't there anymore
That deviantart account closed. I just used this picture instead http://www.sxc.hu/photo/1405918