
Make skin look perfect in one-click with these AI-powered Photoshop actions.
- Brush size: 20px
- Hardness: 0%
- Opacity: 15%
- Flow: 100%
Use the Eraser on the area shown below:


Next we’re going to add some splashes to make it look like real waterfalls. To start, let’s create a new layer (Ctrl/Cmd + Shift + N) and name it “Waterfall2splash”. Once you’re done with that, we’ll need to open the “WaterBrushesSampler” brushes by FrozenStarRo.
Remember: Right click on the canvas using the Brush tool (B) to bring up the Brush tool’s menu. Once open, click on the drop-down button to open the advanced options and once that’s open, click on Load Brushes and then locate “Water BrushesSampler”. Once you’ve loaded the brushes, find and click on this brush:

When you have that specific brush ready, input the following values for the brush tool:
- Brush size: 150px
- Hardness: Default
- Opacity: 50%
- Flow: 100%
- #: ffffff
Apply the brush on the area shown below:


Now, let’s create another splash. Create a new layer again but this time, name it: “Waterfall2splash2”. We’re going to use the same brush that we had just used (Brush 662 of WaterBrushesSampler). Use the following settings for the Brush tool (B):
- Brush size: 150px
- Hardness: Default
- Opacity: 50%
- Flow: 100%
- #: ffffff
Use the Brush on the region shown below:


Next, we’re going to erase the excess for composition purposes. Activate the Eraser tool (E) and input the following values:
- Brush size: 80px
- Hardness: 0%
- Opacity: 50%
- Flow: 100%


When you’re done, select all the layers that you’ve created on this step and press Ctrl/Cmd + G to group them. Name this group “Waterfalls”.
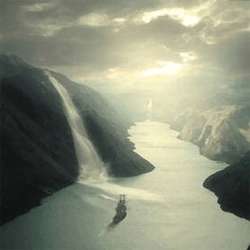
Step 4: Add the Ship
In this step, we will add the ship. To start, let’s open “Tall Ship 6” by Alegion Stock. You’d notice that this stock has a transparent background this means that you could simply transfer this image to the canvas. Upon opening, just activate the Move tool (V) and drag that ship to our canvas.
Upon moving, rename this layer to “Ship” and activate the Transform tool (Ctrl/Cmd + T) while this layer is activated and then right click on the ship to show the contextual menu. Once this menu is shown, click on Flip Horizontal. See image below:


Now, we’re going to resize this ship to make it appear like it is on the lake. Activate the Transform tool (Ctrl/Cmd + T) and resize the image as seen below:

When you’re done, we’re going to adjust the Brightness/Contrast of the ship to make it blend with the rest of the images. Click on the “Ship” layer and then go to Image > Adjustments > Brightness/Contrast and input the following values:
4 comments on “Create a Beautiful River Scenery in Photoshop”
nice :D
lovely~
the river photo on deviant arts, several links are the exact photo here, very popular tutorial, thanks!
stockimage 10 isn't there anymore
That deviantart account closed. I just used this picture instead http://www.sxc.hu/photo/1405918