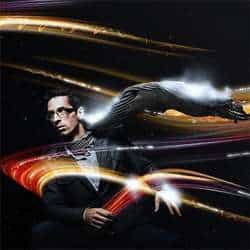

Make your artwork look like they're from an alternate universe. These Cyberpunk presets work with Photoshop (via the Camera Raw filter) and Lightroom. Download all 788 presets for 90% off.
![step-002d[4]](https://cdn.photoshoptutorials.ws/images/stories/83159c1e25e6_21C8/step-002d4.png?strip=all&lossy=1&quality=70&webp=70&avif=70&w=1920&ssl=1 "step-002d[4]")
Step 3
Drag the Blured lights stock image into your document and place it behind the model's layer.
![step-003[4]](https://cdn.photoshoptutorials.ws/images/stories/83159c1e25e6_21C8/step-0034.png?strip=all&lossy=1&quality=70&webp=70&avif=70&w=1920&ssl=1 "step-003[4]")
Go to menu Image>Adjustments>Brightness and contrast and apply the next settings.(You need to apply this twice with the values show below)
![step-003a[4]](https://cdn.photoshoptutorials.ws/images/stories/83159c1e25e6_21C8/step-003a4.png?strip=all&lossy=1&quality=70&webp=70&avif=70&w=1920&ssl=1 "step-003a[4]")
![step-003b[4]](https://cdn.photoshoptutorials.ws/images/stories/83159c1e25e6_21C8/step-003b4.png?strip=all&lossy=1&quality=70&webp=70&avif=70&w=1920&ssl=1 "step-003b[4]")
I want to get more red and pink tones. To do that, go to menu Image>Adjustments>Hue and Saturation (or Ctrl+U) and apply the next settings:
![step-003c[4]](https://cdn.photoshoptutorials.ws/images/stories/83159c1e25e6_21C8/step-003c4.png?strip=all&lossy=1&quality=70&webp=70&avif=70&w=1920&ssl=1 "step-003c[4]")
Now we are going to apply some more blur to the image to get more defined lines of light.Go to filter Blur>Motion Blur and use a Distance of 710 pixels with 0° angle.
![step-003d[4]](https://cdn.photoshoptutorials.ws/images/stories/83159c1e25e6_21C8/step-003d4.png?strip=all&lossy=1&quality=70&webp=70&avif=70&w=1920&ssl=1 "step-003d[4]")
Go to the Rectangular Marquee tool (M) and set the feather value to 10 pixels. Select a portion of the lights and Copy/Paste them into a new layer:
![step-003e[4]](https://cdn.photoshoptutorials.ws/images/stories/83159c1e25e6_21C8/step-003e4.png?strip=all&lossy=1&quality=70&webp=70&avif=70&w=1920&ssl=1 "step-003e[4]")
Step 4
Select the move tool (V). We are going to distort this new layer to get a curvy shape. Go to Edit>Transform>Warp and distort the image to a curvy shape.Try experimenting warping the shape in different forms.
![step-004[4]](https://cdn.photoshoptutorials.ws/images/stories/83159c1e25e6_21C8/step-0044.png?strip=all&lossy=1&quality=70&webp=70&avif=70&w=1920&ssl=1 "step-004[4]")
Change the layer Blending mode to "Lighten" and duplicate it twice.Move one of this layers slightly up and the second duplicated layer slightly down from the main lights layer.Change the layer opacity of the upper layer to 60% and the lower to 35%:
![step-004a[4]](https://cdn.photoshoptutorials.ws/images/stories/83159c1e25e6_21C8/step-004a4.png?strip=all&lossy=1&quality=70&webp=70&avif=70&w=1920&ssl=1 "step-004a[4]")
Duplicate again the main lights layer and place copies around the image.Use the Eraser (E) tool with a round brush about 300 pixels wide and 0% hardness to erase parts not needed:
![step-004b[4]](https://cdn.photoshoptutorials.ws/images/stories/83159c1e25e6_21C8/step-004b4.png?strip=all&lossy=1&quality=70&webp=70&avif=70&w=1920&ssl=1 "step-004b[4]")
![step-004c[4]](https://cdn.photoshoptutorials.ws/images/stories/83159c1e25e6_21C8/step-004c4.png?strip=all&lossy=1&quality=70&webp=70&avif=70&w=1920&ssl=1 "step-004c[4]")
Step 5
Duplicate again the main layer but this time place it above the model's layer.Distort the image once again using the Warp transform option and erase anything unwanted. Set this layers blending mode to "Screen" instead of lighten.
![step-005[4]](https://cdn.photoshoptutorials.ws/images/stories/83159c1e25e6_21C8/step-0054.png?strip=all&lossy=1&quality=70&webp=70&avif=70&w=1920&ssl=1 "step-005[4]")
![step-005a[4]](https://cdn.photoshoptutorials.ws/images/stories/83159c1e25e6_21C8/step-005a4.png?strip=all&lossy=1&quality=70&webp=70&avif=70&w=1920&ssl=1 "step-005a[4]")
Step 6
Create a new layer and go to the "Single Row Marquee tool" (M)(located under the options for the Marquee tool) and select any row horizontal row of pixels,right click and "Fill" with a bright yellow color.
![step-006[3]](https://cdn.photoshoptutorials.ws/images/stories/83159c1e25e6_21C8/step-0063.png?strip=all&lossy=1&quality=70&webp=70&avif=70&w=1920&ssl=1 "step-006[3]")
Go now to Filter>Distort>Wave and use the setting below to distort the line into a wavy detail for the light effects.
![step-006a[3]](https://cdn.photoshoptutorials.ws/images/stories/83159c1e25e6_21C8/step-006a3.png?strip=all&lossy=1&quality=70&webp=70&avif=70&w=1920&ssl=1 "step-006a[3]")
Change the layer blending mode to "Linear Dodge" and place over the light effects.Use the eraser tool to delete the endings of the wave:
6 comments on “Create a Dynamic Portrait with Flashy Light Effects”
this is lame
Thanks. .....my help. ..
Wonderful tutorial..Thanks for sharing.
u r tutorial very nice but step using wave are not mentioned which can be diffult to ordinary person
if you find difficulties with step three, for e.g. i got constant black background behind the lights although i did all the steps, just change layer mode to lighten...
Thanx very much