

Luminar AI lets you turn your ideas into reality with powerful, intelligent AI. Download the photo editor and see how you can completely transform your photos in a few clicks.
- Brush size: 150px
- Hardness: 0%
- Opacity: 100%
- Flow: 100%
Let's erase it now:

The result should be similar to this:

Now, we will make this lightning glow. To do that, right click on "Lightning 1" and then click on Blending Options.

When the Blending Options menu opens, click on "Outer Glow" and set the following:
- Outer Glow:
- Blend mode: Screen
- Opacity: 50%
- Noise: 0%
- #: efb0ff
- Technique: Softer
- Spread: 0%
- Size: 0px

The result of that should be similar to this:

Next, let's now move to creating the second lightning bolt. Create a new layer (Ctrl/Cmd + Shift + N) and then name it "Lightning 2". Activate the Brush tool (B), make sure that "Lightning Bolt Brushes V1" by GhostFight3r is loaded, and then select the following brush from the set:

Now, that you have that brush loaded, change its settings to the following:
- Brush size: 200px
- Hardness: 0%
- Opacity: 100%
- Flow: 100%
- #: dff9ff
Paint "Lightning 2" on the region shown below to give a sense of depth:

The result should be as follows:

We would also need to make it glow so right click on "Lightning 1" and then click on "Copy Layer Style"

Now, right click again on "Lightning 2" and then click on "Paste Layer Style"

Now, let's give a bolt source for "Lightning 2". To start, create a new layer (Ctrl/Cmd + Shift + N) and then name it "Bolt source". Make sure that this layer is above "Lightning 2". Activate the Brush tool (B) and then click on that drop-down button again to open the contextual menu and then click on "Reset Brushes" since we're going to use the default PS brushes once again. Once they have been reset, set the Brush tool's settings to the following:
- Brush size: 80px
- Hardness: 0%
- Opacity: 25%
- Flow: 100%
- #: ebfbff

The result should be similar to the following:

Group these layers (select all layers and press Ctrl/Cmd + G) and name the group to "Lightning".
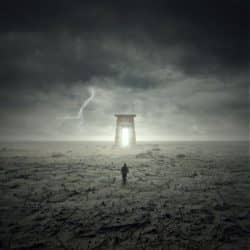
Step 6: Create the Portal
Now, let's add the highlight of this image, the portal. To start, open "Arch Gate 07" by Dralliance Stock. Once the image is open, activate the Polygonal Lasso tool (L) and then create a selection area around the gate. See image below:

Now that you have created a selection area around the gate, you may now move it to our canvas using the Move tool (V).
Upon moving the image to our canvas, rename this new layer to "Portal".
As you've noticed, its size would be something like this: