
Turn any photo into a dot grid artwork with these Photoshop actions. You'll get great results with dots that change size. They get larger in brighter areas and smaller in darker areas. Free download available.
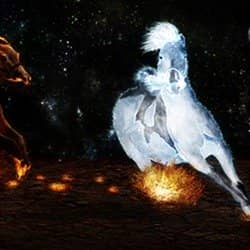
In this Photoshop tutorial we will compose a fantasy scene depicting a fire horse chasing an ice horse on a volcanic field. We will learn to use a small number of elements in various circumstances to achieve different effects.
Preview of Final Results

“A Chase of Fire and Ice” Photoshop Tutorial
Resources
- Horses at play 2
- Fire flames 1
- Cracked earth texture
- Stars Background
- Frost texture brushes
- Smoke Brush
- Full Moon Luc Viatour
Step 1
Open file "Horses at play 2". Using the pen tool select the 2 horses. Don't worry too much about the hair as we will resolve this issue later.

Step 2
With the path still active pres ctrl+Enter to transform path into a selection. Press ctrl+J to copy selection into a new layer and turn off the visibility of the Background layer. Name the new layer horses.

Step 3
Go to File > Place and select "Stars Background". Resize it like in the image bellow and press Enter. Move this layer below our horses layer.

Step 4
Now we will refine our horses selection by creating some hair. First press ctrl on the horses layer to select it's opaque pixels. Press ctrl+alt+R to open refine selection window. Use settings like shown below.

Step 5
If the horses are still selected press ctrl+D to deselect them. Turn on the visibility of the Horses layer and add a layer mask. Choose a brush with the following settings:
- Size: 100 px
- Hardness: 0%
Select black as foreground color and brush gently in the areas shown below. Make sure you are brushing in the layer mask and not in the layer itself.

Step 6
Select layer Horses and layer Horses copy by holding ctrl and clicking on them. Pres ctrl+E to merge them together. Name the new layer Horses.

Step 7
Now comes the tedious part. We will recreate the horses hair by using the smudge tool. Select the smudge tool and use a fairly small 3 px size to drag hairs following the natural way the hair falls. Use smaller and larger brush sizes, but don't go beyond 8 px. Try to imagine the way hair is blown by the wind. This task took me about 40 minutes to accomplish so take your time. Now it is also a good time to tone down the highlights from the horses skin and to reduce the harsh transitions between highlights and shadows. For this task I used the Clone Stamp tool set at 10% opacity and sampled from the darker skin.
2 comments on “Create a Spectacular Space Scene in Photoshop”
what are the settings for the fire horse color balance?
What are the settings used on color balance layer?