
Luminar AI lets you turn your ideas into reality with powerful, intelligent AI. Download the photo editor and see how you can completely transform your photos in a few clicks.

Step 24
We will add some fire to the hoofs. Press ctr+V to paste the flame into our document. Resize it and warp it like in the image below. Press ctrl+V again and place this flame to the other hoof.

Step 25
Let's add some heat to the tail. Make a new layer and select " Fire Brush " from the brush presets. Choose color #e6912d as our foreground color and brush gently over our fire horse's tail. Change the layer blend mode to Overlay.

Step 26
We will change the color of the eyes. Make a new layer and change it's blend mode to Color Dodge. Choose a round brush with the following settings:
- Size: 20 px
- Hardness: 0%
Choose #e6912d as foreground color and brush gently over the eye area. Double click our layer to enter advanced blending mode and choose the settings shown below.

Step 27
Let's add some flames to the nostrils. Paste "Fire Flames 1 " into our document and change the blend mode to screen. Resize and warp like in the image below. Press Enter. Add a layer mask and choose a round brush with the following settings:
- Size: 30 px
- Hardness: 0%
Brush gently to mask areas that overlap the nostril.

Step 28
Now we will add some flame to the other nostril. Paste " Fire Flames 1" into our document and change the blend mode to Screen. Resize like shown below. Add a layer mask and mask like in the image below.

Step 29
We will refine our fire horse by adding some inner and outer glow. Double click layer Left Horse to enter advanced blending mode and use settings like shown below.

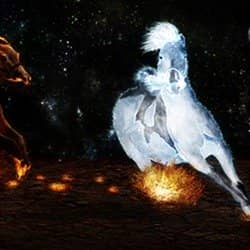
Step 30
Select layer Left Horse and all the layers above him. Press ctrl+G to group them. Name this group Fire Horse. Place the layer Right Horse above the group Fire Horse.

Step 31
Now we will make our right horse an ice horse. Select Right Horse layer and press ctrl+I to invert it.

Step 32
Press Ctrl+J to make a copy of the layer Right Horse. Go to Filter > Artistic > Plastic Wrap and apply settings like shown below. Change the layer blend mode to Lighten and lower the opacity to 50%. Add a layer mask and using a black soft brush mask the areas where the hair is.

Step 33
Select Right Horse layer and press ctrl+J to make a duplicate. Press ctrl+shift+] to move this layer on top of all other layers. Apply filter > Sketch > Chrome. Set the layer blend mode to Soft Light and lower the opacity to 30%. Add a layer mask and mask the areas where the hair is.
2 comments on “Create a Spectacular Space Scene in Photoshop”
what are the settings for the fire horse color balance?
What are the settings used on color balance layer?