
Luminar AI lets you turn your ideas into reality with powerful, intelligent AI. Download the photo editor and see how you can completely transform your photos in a few clicks.
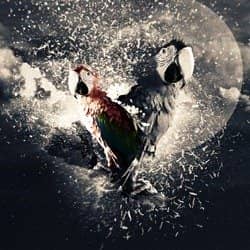
As we know, the parrot lives in the forest, and he loves nature - trees, flowers, etc. What the parrot is trying to tell us is that his life is colorful. Today I am going to show you how to use a picture of an animal to create an awesome abstract. Also, I am going to show you more techniques that can help you to understand how to manipulate layers.
Preview of Final Results

Download the PSD
My Life is Colorful.zip | 25.3 MB
Parrot Photo Manipulation Photoshop Tutorial
Resources
- Explosion Brushes - twenstudio
- Clouds - brusheezy
- Tree&Flowers - deviantart
- Paint Throws - digitaljuice
Step 1
Create a new document with the following dimensions: 1920 X 1200 Pixel. remove the lock option from the background and rename it to: Bg.

Fill the Background with Code color #272727.

Step 2
Select gradient tool and make sure you choose Gradient Black Transparent as you seen, press and drag from the top to down after this change mode layer to Soft Light and Opacity to 62%.


Step 3
Use Smooth brush to create blur circles and change mode layer to Soft Light and Opacity to 81% as you seen in the image below.


Step 4
Add Moon Brush to work and change mode layer to Soft Light.


Step 5
Again Select 2 cloud brushes from the set and add them to work and change opacity layer for the first brush to 34% and the second brush to 56% as you see in the image below.


Step 6
Ok let's move to the next step by select explosion brushes and start adding the first brush from the set, follow my step.

Step 7
Add another explosion brush and make sure you select Quick Mask Mode by Pressing on "Q" then start removing Edges by following the steps.


Step 8
Do the same thing as I did before in the first step add another explosion brush and remove the edges.


Step 9
Hide All layers and choose another Explosion Brush from the set add it to work after this show layers again as you seen in the image below.


Step 10
Open Air Balloon picture and Select just part of it, Copy and paste into Project.


Step 11
Let's Remove the color from Air Balloon by following the Settings Image > Adjustments > Desaturate or you can just press Shift+Ctrl+U after this change mode layer to Soft Light.


Step 12
Open parrot picture and set up settings pen tool and Select just the part that we need.


Step 13
Right your Mouse Select "Make Selection" and type in the following value "Feather Radius: 0".
One comment on “Create a Stunning Parrot Photo Manipulation in Photoshop”
Wow! This is just brilliant. Its all i needed to becoming a good designer and painter. Thanks alot am so greatful.