
Make your artwork look like they're from an alternate universe. These Cyberpunk presets work with Photoshop (via the Camera Raw filter) and Lightroom. Download all 788 presets for 90% off.
![image010[1]](https://cdn.photoshoptutorials.ws/images/stories/4e87332e2856_11009/image0101.jpg?strip=all&lossy=1&quality=70&webp=70&avif=70&w=1920&ssl=1 "image010[1]")
Step 9
Now we will add some cold color to our foreground. Add a photo filter adjustment layer by going to Layer > New adjustment layer > Photo Filter. See that this adjustment layer it's clipping our foreground layer and it sits above our previous adjustment layer. Use following settings:
- Color: #bfd500
- Density: 93%
- Preserve Luminosity: checked
Change the blending mode to "Color dodge" and lower the fill to 40%.
![image011[1]](https://cdn.photoshoptutorials.ws/images/stories/4e87332e2856_11009/image0111.jpg?strip=all&lossy=1&quality=70&webp=70&avif=70&w=1920&ssl=1 "image011[1]")
Step 10
Press D to choose default colors then press G to choose the gradient tool. Be sure that in the gradient option bar it's selected "Foreground to Background". Holding the Shift key drag the gradient like shown in the image below.
![image012[1]](https://cdn.photoshoptutorials.ws/images/stories/4e87332e2856_11009/image0121.jpg?strip=all&lossy=1&quality=70&webp=70&avif=70&w=1920&ssl=1 "image012[1]")
Step 11
Add another clipped Photo Filter adjustment layer above our previous adjustment layer and use the following settings:
- Color: #08eefc
- Density: 93%
- Preserve Luminosity: checked
Change the blending mode to "Overlay" and lower the opacity to 20%. Hold the alt key then drag and drop the layer mask from "Photo Filter 1" to layer mask from "Photo Filter 2". You will be prompted " Replace Layer Mask ?". Choose yes then press Ctrl +I to invert our layer mask.
![image013[1]](https://cdn.photoshoptutorials.ws/images/stories/4e87332e2856_11009/image0131.jpg?strip=all&lossy=1&quality=70&webp=70&avif=70&w=1920&ssl=1 "image013[1]")
Step 12
Add a clipped Color Balance adjustment layer and use the settings shown in the image below. Change the blending mode to "Soft Light" and opacity to 44%.
![image014[1]](https://cdn.photoshoptutorials.ws/images/stories/4e87332e2856_11009/image0141.jpg?strip=all&lossy=1&quality=70&webp=70&avif=70&w=1920&ssl=1 "image014[1]")
Step 13
Select Foreground layer and all the layers above then press ctrl+G to group them. Name this group Foreground.
![image015[1]](https://cdn.photoshoptutorials.ws/images/stories/4e87332e2856_11009/image0151.jpg?strip=all&lossy=1&quality=70&webp=70&avif=70&w=1920&ssl=1 "image015[1]")
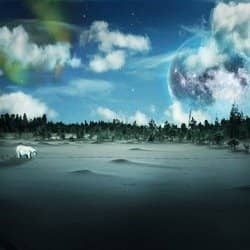
Step 14
Go to File > Place and open " Sky panorama with clouds " . Drag the handle points and position him until it look like in the image below then press Enter. Be sure to put this layer below the Foreground group. Rename it "Sky".
![image016[1]](https://cdn.photoshoptutorials.ws/images/stories/4e87332e2856_11009/image0161.jpg?strip=all&lossy=1&quality=70&webp=70&avif=70&w=1920&ssl=1 "image016[1]")
Step 15
Make a new gradient map adjustment layer and make sure it's clipping our sky layer. Use settings like shown in the image below. For the foreground color choose black and for the background color choose # 0ef0f8. Change the blending mode to "Soft Light" and lower the opacity to 40%.
![image017[1]](https://cdn.photoshoptutorials.ws/images/stories/4e87332e2856_11009/image0171.jpg?strip=all&lossy=1&quality=70&webp=70&avif=70&w=1920&ssl=1 "image017[1]")
Step 16
Make a new Curves adjustment layer and make it's clipping the sky layer. Use settings like shown in the image below. Leave the blending mode set to normal.
![image018[1]](https://cdn.photoshoptutorials.ws/images/stories/4e87332e2856_11009/image0181.jpg?strip=all&lossy=1&quality=70&webp=70&avif=70&w=1920&ssl=1 "image018[1]")
Step 17
Select the sky layer and it's clipping layers then press ctrl+G to group them. Name this group Sky. You can select multiple layers by holding Ctrl then clicking the layers you want to select.
2 comments on “Create a Surreal Arctic Scene in Photoshop”
Ahlie
Great tutorial, best regards from Czech Rep.