
Make skin look perfect in one-click with these AI-powered Photoshop actions.
![image019[1]](https://cdn.photoshoptutorials.ws/images/stories/4e87332e2856_11009/image0191.jpg?strip=all&lossy=1&quality=70&webp=70&avif=70&w=1920&ssl=1 "image019[1]")
Step 18
Open "Full Moon Luc Viatour" file. Select the moon using the round marquee selection tool, press ctr+C to copy it then paste it in our document. Place this layer between the sky and foreground layer. Name this layer Moon. *Tip* When you need to make a tricky selection like objects in perspective or ellipses : 1. Draw a selection using marquee tool . 2.Press Q to enter quick mask mode. 3. Press Ctrl+T to transform your selection. Now you can adjust the selection to your heart desire using skew, perspective etc. 4. Press enter to apply transformation and press Q to exit Quick Mask mode. In order for this to work properly double click the quick selection icon from our toolbar on the left and choose "selected areas" option.
![image020[1]](https://cdn.photoshoptutorials.ws/images/stories/4e87332e2856_11009/image0201.jpg?strip=all&lossy=1&quality=70&webp=70&avif=70&w=1920&ssl=1 "image020[1]")
Step 19
Open the advanced blending mode of the layer moon by double clicking it. Use the settings shown in the image below.

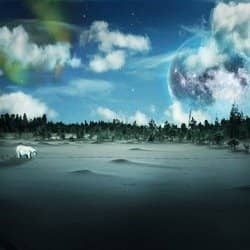
Step 20
Position the moon like shown in the image below. Add a layer mask by clicking on the button "Add Layer mask" at the bottom of the layers panel.
![image022[1]](https://cdn.photoshoptutorials.ws/images/stories/4e87332e2856_11009/image0221.jpg?strip=all&lossy=1&quality=70&webp=70&avif=70&w=1920&ssl=1 "image022[1]")
Step 21
Select layer mask. Choose gradient tool and select reflected gradient. Press D to set default colors. Drag from middle of the moon to bottom. Now the top and the bottom of the moon blend seamlessly with the sky. Select a brush tool with the following settings:
- Size: 100 px
- Hardness: 0%
Set the brush opacity to 50% and make sure mask of the layer moon it's selected. If it is not selected, simply click on it. Then brush gently over the areas were the clouds are overlapping our moon. We see that our moon is a bit fade so raise the moon layer opacity to 80%.
![image023[1]](https://cdn.photoshoptutorials.ws/images/stories/4e87332e2856_11009/image0231.jpg?strip=all&lossy=1&quality=70&webp=70&avif=70&w=1920&ssl=1 "image023[1]")
Step 22
Press ctrl+shift+N to make a new layer and position it above our moon layer. Press shift+F5 to fill it and choose 50% gray. Then go to Filter > Noise > Add noise and use a setting of 4%, check Gaussian and monochromatic. Press ctrl+M to open curves adjustment and drag the black point and the white point towards each other, so they will meet in the middle. Now we have a black sky with white stars. If you cannot see the stars you are zoomed too far out. This is because Photoshop dumps "unimportant" pixels when it zooms out, but it is only a temporary thing. When you save the file the stars will be there. You can also pres ctrl+1 to zoom to the actual size of the image and you will see the stars.
2 comments on “Create a Surreal Arctic Scene in Photoshop”
Ahlie
Great tutorial, best regards from Czech Rep.