

Download Lightroom presets and LUTs, absolutely free. Use the presets to add creativity and style to your photos.

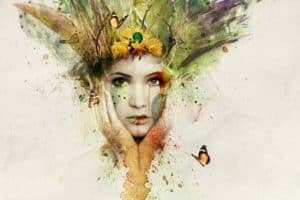
Step 9
I add a Curves layer (Clipping Mask) to brighten the branches a bit:

Step 10
Open branches 2 stock. I take a part from this pic and situate it at the top right of model head, then duplicate it twice, name them from 1 to 3. I flip 2nd horizontally, then position them around model head part. I use layer mask to erase the bottom of the third:


Step 11
These branches look darker from background so I want to brighten them together. To do it, make these layers selected then hit Cmd/Ctrl+G to make group for them. Change the mode of this group from Pass Through (default group mode) to Normal 100%. On 3 layer, go to Layer-New Adjustment Layer-Curves:

Because the mode changed to Normal 100% so this Curves layer only affects the layers inside this group (branches 2 ones).

Step 12
Make a new layer on the top. Set foreground and background to #a8ba81 and #012955. Use Rectangular Marquee Tool to make a square on the pic then go to Filter-Render-Clouds. After applying Clouds filter, choose Filter-Pixelate-Mosaic:

Filter-Distort-Polar Coordinates:

Step 13
Convert this result to Smart Object then downsize it and change the mode to Hard Light 100%. Use Cmd/Ctrl+T to rotate it and move it to the right cheek of model and erase unwanted parts with layer mask:

Duplicate this layer and move to left cheek under the eye, hide the left part of it with black brush and layer mask:

I use a Color Balance layer (Clipping Mask) to change color of this effect:

Step 14
Make a new layer and use hard brush with color #012955 to make some dots under the left eye. Before spotting, press F5 to change settings for this brush:


Double click this layer and apply Gradient Overlay for these dots:


Step 15
Create a new layer and make selection for the lips, fill it with color #779370 then change the mode to Hard Light 100%:

I name it "color lips".
Step 16
I use a new layer, change brush to splatter ones and set foreground to #83192d. Take brush number 681 with size about 100 px to spot over the lips. Hold Cmd/Ctrl while clicking "color lips" layer to load it selection then click Add layer mask button. After it, change the mode to Overlay 100%:
81 comments on “How to Create an Amazing Watercolor Artwork in Photoshop”
the butterfly is gone... it looks nice
Great Job!!!! So creative!!!! I will be trying it!!! Thanks so much!
Thanks for this tutorial
this tutorial is so poopy, i actually had a seizure while trying to read the directions, now i have to take meds daily so i don't shake and die, thanks.
Sincerely, Barrack O.
its awesome
Excellent tutorial Jenny! ??
The model photo is not available for free anymore
Thank you Jenny... see: http://hntrss.deviantart.com/art/Watercolor-659600124
wwwwwwwwwwoooooooooooooooohhhhhhhhhhhhhhh its really awesome
Nice and clear tutorial
HI, It was great to try out the example. Is there any chance we could get PSD .
Good one
This is absolutely amazing! Love it! Great job Jenny! I want to give this a shot. Love how you've provided step-by-step instructions!
Wow. What an awesome picture! And I love how you broke it down, step-by-step. And though it may take some time, the effort definitely looks like it's worth it! Thanks so much for this post. I'll definitely be giving it a shot this weekend when I have some free time.
Excellent tutorial indeed on photo manipulation and create nice watercolor. I have tried it several times and now I am able to do make watercolor artwork like this. Thank you so much for sharing. Great!
i love your website thanks you very much sir create this website wornderful tutorials
Unfortunately the result of the clouds/pixelate/polar coordinates gives me a complete different result :( any ideas?
very nice
This is awasome explain
one of the resources are not available
SUPERB EFFORT..
amazing like alwways
PSD file please - amazing job
Thanks, very useful and instructive workshop. My result is here: https://www.flickr.com/photos/52473811@N06/23637066279/in/dateposted-public/
Nice work.. related to some work at site http://www.tutsgeek.com . work is good and Awesome .keep it up
For those having trouble with step 12, getting the clouds to show foreground and background colors...
I had this same problem. Go to Image - Mode - 8 bit. That trick only works with 8 bit files, not 16 bit.
Nice Tutorial! My try : http://eatablecloud.deviantart.com/art/nutritionjunkie-and-her-true-nature-531020355
Wonderful!! Thank you so much for the effort to create this tutorial... would love to see some video tutorials (with voice and slow/ not the fast ones, please). Your work here is just beautiful and the concept is striking. Thank you so much.
I like the idea of this tutorial, it’s very creative and the result looks great.
psd file please
wow.. Fantastic steps.. I really like it. keep up :-)
Thank you for the tutorial! I have made it a bit different, as a beginner I am missing some information here - where exactly to place each layer, in which sequence - above or under the main and etc.. Here is my version: http://milanaserk.deviantart.com/art/Duality-479211677
Thank you so much this become inspiration to create poster for my friend birthday
I Like Watching And Not Knowing Interesting New facts from photoshop tutorials can you recommend any Good ones
Sincerely Ben Hughes
Greetings I have taken this tutorial into account and it has interested me much.
Many thanks Hen Poughes
nice work, appreciate this tutorial
This is a real good Tutorial. I did it with a picture of me and it works :) see it here. https://www.facebook.com/photo.php?fbid=10201256036832771&set=a.2337217919695.2099441.1527282977&type=1
Thank you!
In step 7, which blend mode is used on the new layers?
Hi jenny,
just trying to work through your tutorial and in step 12, i am filling in the right colors for background and foregound just when i do Filter-Render-Clouds and so forth it looks a bit different and my end result after Filter-Distort-Polar Coordinates it turns out more like a few bumpy semi circles emerging from the base rather than the shape you have. Are there any ways to fix this or have i missed something?
Thank you so much for your time
I had this same problem. Go to Image - Mode - 8 bit. That trick only works with 8 bit files.
Very nice work, thank you for the inspiration.
I did it and published it here: http://anne-wipf.deviantart.com/art/Watercolor-portrait-415303371 Thank you!
Thank you for this work. Its AMAZING!
My attempt:
http://iiswtrice.deviantart.com/art/NatureGirl1-413729638?q=gallery%3Aiiswtrice&qo=0
thanks
Hi
First of all thanks for the brilliant tutorial both in subject matter and in your way of presenting each step. I am however miserably stuck on step 12. Everything is fine until I get to the polar coordinates then it looks nothing like yours. Mine are waves upon ways of rounded off squares. I have no clue what I'm doing wrong here. Everything is set us as in the tutorial. Any idea what I'm doing wrong?
Thanks :)
As a retoucher I went through hundreds of tutorials through the years and this is one of the easiest to follow because of the way you explained it and showed every screen shot with setting and even your masking. Great job!
I WANT TO TELL YOU COULD MAKE EVERY STEP TUTORIAL ENJOY EVERY DAY, WISH YOU HAVE SUCCESS ALWAYS BLESSINGS
I Like this tutorial. So I want to make this art.
I've made it!
http://leila365.deviantart.com/art/Blur-Forestal4-402463380
I have no idea what you did to do step 4.
How I do step 12!!! My cloud goes black and white!!!!
I don't know how to do step 3
Had fun! Your directions were simple to follow and usually that never happens for me.
Thanks for the tutorial! Here there is my version
http://silvialorica.tumblr.com/post/61307248821/the-forest-creature-thanks-to-this-tutorial-to
Hi! I followed your tutorial and got a really nice image. My friend wanted to know if he could use it as an album cover, and I'm going to be tweaking it a little to make sure none of the images I used are copyrighted. Would you mind me using it? I just wanted to ask because I learned how to do it from your post.
Of course you can, thanks for asking :).
Really nice tutorial! It turns out really good!
Next time you could think about mabye using stock photo providers that don't need a paying registration.
And i feel sometimes that you just assume that the reader know how to do a special command or feature.
Otherwise, really one of the best so far! :D
Thank you very much! :)
keep these cool tutorales coming!
psd file please
I'm newer to photoshop and having a small issue with step 4 and getting the picture to fade like it does with the layer mask. Any tips? I'm using a different photo but a similar post. I've extracted the photo correctly but just can not get that same effect.
Thanks.
Hi El,
First i used soft brush with 100 opacity to remove the hard edges of the woman then i lowered brush opacity and flow (about 30-50%)when painting on the head, shoulders and hands. Hope it helps :).
Wonderful
But why photoshop tutorial do not give the downloading for these pages as it is...
PSD file required net connectivity to see it again...
Thank you for this beautiful tutorial.
My realization:
http://www.chez-mireilled.com/article-aquarelle-abstraite-avec-photoshop-119940769.html
I wouldn't say that if looks anything like Garrets.
very nice tutorial, i've followed it with couple of changes, you can see the result on my 500px:
http://500px.com/photo/45595724
thanks again!
very nice tutorial, I've done it with couple of changes. you can see it on my 500px:
http://500px.com/photo/45595724
thanks again!
LIKE!
I really want to see your work but the link isn't working :(
Can you repost your work?
哦,nice
Your tutorial is so easy to understand and you express it very cleanly. Photoshop is really a wonder
This looks difficult
It's not. I completed a photograph in under 2 hours. It's mainly layering watercolor paint images, set to multiply and mask out what you don't want; in a nutshell.
See it here: http://www.flickr.com/photos/23859710@N02/12805900225/
Beautiful....
hmm similar to a poster i made back in July
http://zefhd.deviantart.com/art/Enlightenment-388744102
not really though
Naaahh this one is much better
Yes, you have used similar texture ...but where or what is the concept of your artwork?
Jenny, all I can say is WOWWWW!!!!
Thank you!
is there any fees for tutorials
The psd file please