
Luminar AI lets you turn your ideas into reality with powerful, intelligent AI. Download the photo editor and see how you can completely transform your photos in a few clicks.

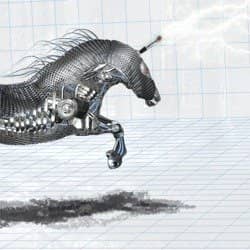
Step 8
Open file “Moto 2”. Make a selection like shown below then press Ctrl+J to make a new layer from selection. Copy and paste this layer into our horse document. Make a duplicate of this layer then using Free Transform position these layers like shown below. Group the two layers and name the group “Hooves”.

Step 9
Go back to “Moto 2” and make another 2 selections like shown below. Move each selection on a new layer using Ctrl+J. Copy these layers then paste them into our horse document. Position them like shown below. Group these layers and name the group “Leg Pistons”. Apply a “Bevel and Emboss” effect to each of the pistons.

Step 10
Open file “Fat Boy 2” and make a selection like shown below. Move this selection on a new layer then copy and paste it in our horse document. Make a duplicate then position the layers like shown below. Group them and name the group “Joints”.

Step 11
Open file “2 Cylinder“ and make a selection like shown below. Make a new layer from selection than copy and paste the layer into our horse document. Make another 3 duplicates then sing Free Transform and Warp position them like shown in the image below. Group them and name this group “Ribs-Neck”.

Step 12
Open file “ Moto 2” and make a selection like shown below. Press Ctrl+J to make a new layer from selection. Copy and paste this layer into our horse document. Make a duplicate of this layer then using Free Transform and warp position these layers like shown below. Group these layers and name the group “Leg Pipes”.

Step 13
Select one “rib” from “Ribs-Neck” group and duplicate it than move it on top of all layers. Use Free transform and warp to make it look like shown below than make another 2 duplicates. Group this layers and name them “Ribs-Leg”.

Step 14
Open file “Fat boy 2” and make a selection like shown below. Make a new layer from selection than copy and paste into our horse document. Open file “2 Cylinder” and make a selection like shown below. Make a new layer from selection than copy and paste this layer into horse document. Make a duplicate and erase the dark part. Now Free Transform these 3 layers until they look like shown in the image below. Group them and name the group “Main Frame”.
3 comments on “Create an Amazing Mechanical Horse in Photoshop”
Why don't you click on next page.....?
why you dnt copmlete it.....?
it`s on the next page, just click on them shazia.x