
Turn any photo into a dot grid artwork with these Photoshop actions. You'll get great results with dots that change size. They get larger in brighter areas and smaller in darker areas. Free download available.

Step 36
Select the lightbulb and with a black brush with the size around 200-300px make a shadow at the bottom of the bulb like in the photo.

Set Blending Mode of the layer on Soft Light and Opacity 45%.

Step 37
Click on the "Create new Fill ar Adjustment layer " icon and select from the menu Photo Filter.

Select the "Underwater" Filter and set Density at 75%.

Step 38
Select the entire surface of the water pressing Ctrl+Click on the "aqua background" thumbnail layer and go to Select > Inverse or press Ctrl+Shift+I. Click on the Layer mask thumbnail of the Photo Filter (see photo)

Go to Edit > Fill or press Shift+F5 and select from menu Black.

That was it, I hope you enjoyed this tutorial and you will manage to do your own magic world.
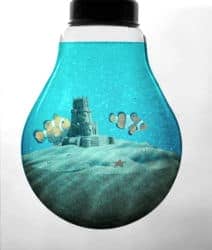
Final Results

Download the PSD
Authors Comment
![profile[1]](https://cdn.photoshoptutorials.ws/wp-content/uploads/migrated-images/5c2bee5a3d99_1390C/profile1.jpg?strip=all&lossy=1&quality=70&webp=70&avif=70&resize=125%2C125&ssl=1 "profile[1]") Thank you for following my tutorial. My name is Chitea Viorel Costin, I have 18 years old and I`m living in Slatina, Romania. I like graphic design and web design and I`m working in Photoshop since 2007.
Thank you for following my tutorial. My name is Chitea Viorel Costin, I have 18 years old and I`m living in Slatina, Romania. I like graphic design and web design and I`m working in Photoshop since 2007.
Chitea Viorel Costin
17 comments on “Create an Aquarium Inside a Light Bulb with Photoshop”
selamm
yanii idare ederimsiii
wooww yes
I think the steps should be more detailed for example, try giving better pictures and deeper instructions for beginners.
Great concept and artwork but the tutorial writing needs improvement. More effort describing each step would help.
period
This tutorial was slightly confusing, but by the end I got the hang of it. Thanks, the results were impressive!
I am a graphic designer so I just ended up using this as a basic guideline since following these directions was getting confusing. I do like the result though. Thanks for the tut.
Thanks
:p :)
Chitea...a mí me gustó ,estás en todos los detalles justo para personas que están aprendiendo como yo.Te felicito.(desde mar del plata (argentina)
?
<3 ;)
:) <3
The spelling in this is awful. It's very confusing and doesn't always make a lot of sense.
This is terrible . He calls the layers by different names the whole time, its inconsistent, confusing, and pretty vague. This tutorial will drive you crazy.
I was lost llike 5 or 6 times...it started off okay then it just got awful...wasted hours trying to do this smh.
Obrigado
Agreed