
Turn any photo into a dot grid artwork with these Photoshop actions. You'll get great results with dots that change size. They get larger in brighter areas and smaller in darker areas. Free download available.

Now go to Edit > Transform > Distort and move the left and right bottom corner as it's shown below.

You'll get something like this.

Change the Blending Mode of this layer on Screen.

After this step your image should be similar to this one.

Step 12 - Adding the Sky
Download the picture of the sky and drag it into the manipulation. Place the layer under all the layers and name it SKY. Press Ctrl + T and resize it on proper size. Create a new adjustment layer Hue/Saturation above the SKY and set the value Saturation on -100. Create Clipping Mask from this layer.

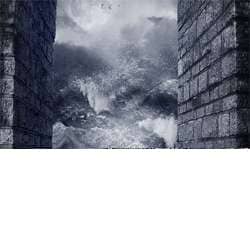
Step 13 - Adding the Wave
Unfortunately the stock photo of the wave is no longer available on the sxc.hu but you can download quite similar photo here. Drag the photo into the manipulation and place it above the SKY. Name the layer MAIN WAVE. Add new vector mask to the layer. You can find the button Add vector mask on the bottom palette Layers left to the button Create new fill or adjustment layer.

Grab the Brush Tool (B), select some soft round brush and pick black color. Paint over the areas of the wave you want to dissapear. It means the sky. I'd recommend you to change the opacity and diameter of the brush to get the more realistic result. After you're done add new adjustment layer Hue/Saturation and set the value Saturation on -100. Create Clipping Mask from this layer. Your image should be similar to the one below.

Step 14 - Adding the Water Splashes
The wave would look better if it has more details. You can create them by adding the water splashes. Download this picture and drag it into the manipulation under the layer MAIN WAVE. Name the layer BIG SPLASH. To extract the splashes easily we will play with Channels a little. But first of all make all layers except the BIG SPLASH invisible. To do that simply click on the eye icon on the left side from the each layer.

Now go the Channels palette. If you don't see it go to Window > Channels and it will appear. below it's shown how the palette looks like.

Right click on the Blue and select Duplicate Channel. Go to Image > Ajustments > Levels and set the Input Levels on 166; 0,77; 227 and press OK. The picture should look like the one below.
4 comments on “Create an Intense Apocalyptic Photo Manipulation”
Great !
this is my version
https://dl-web.dropbox.com/get/My%20Desing/dddddd.png?w=AABKFKWU0NYg1Q9Mqkyr-PaV4kPe3ya5LofvpCm2oBVYbA
tahnks alot
this is all f up...missing instructions
very good but some resources not available ... thanx any way for your excellent tutorial
GREAT!