
Make skin look perfect in one-click with these AI-powered Photoshop actions.

Step 18 - Adding the Man
Download the photo of the man, cut out the background and drag into the manipulation. Place the layer on the top of all layers and name it MAN. Man doesn't fit to the picture well right now. He has very low contrast and is too saturated. To lower the saturation add new adjustment layer Hue/Saturation and set the value Saturation on -70. Create Clipping Mask from the layer.

To make the contrast higher add new adjustment layer Brightness/Contrast and set is as it's seen on the picture below.

Don't forget to create Clipping Mask too. Below you can see how the man looks with each adjustment.

Step 19 - Creating the Focal Point
According to wikipedia.org the focal point is: "In Fine Art, a Focal Point focuses specifically on a point of interest which makes a canvas unique." As I mentioned before the man is the focal point of the image. You want to catch viewer's attention to that spot. To do that you'll add gentle glow arround the man. Thanks to that he will stand out better against the dark background. Click on the layer MAN and then on the button Add a layer style. It's in the bottom part of the Layers palette on the left from the Add vector mask button.

Select the option Outer Glow and set the window as it's shown below.

Press OK. After this step your manipulation should be similar to the one below.

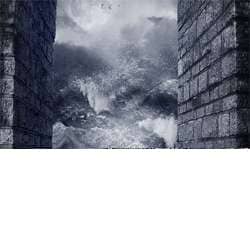
Step 20 - Setting the Global Light
In this step you will set the global light of the whole picture. Thanks to it even more attention will focus on the man. Create a new layer on the top of all layers and name it GLOBAL LIGHT. Grab the Gradient Tool (G), pick #808080 grey color and fill with it the layer. Now go to Filter > Render > Lighting Effects... and set the window as you can see below.

Press OK. Change the Blending Mode of this layer on Overlay. This filter makes your manipulation looking like the one below. The light is more dramatic now.

Step 21 - First Color Adjustment
It's time to change slightly the mood of the picture. Add new adjustment layer Color Balance and set it as below.

Don't create Clipping Mask!

Step 22 - Darkening the Wall
The wall on the right is lighter than the one on the left. To fix it add new adjustment layer Levels on the top of the layers. Set the Input Levels as it's shown below.
4 comments on “Create an Intense Apocalyptic Photo Manipulation”
Great !
this is my version
https://dl-web.dropbox.com/get/My%20Desing/dddddd.png?w=AABKFKWU0NYg1Q9Mqkyr-PaV4kPe3ya5LofvpCm2oBVYbA
tahnks alot
this is all f up...missing instructions
very good but some resources not available ... thanx any way for your excellent tutorial
GREAT!