
Download Lightroom presets and LUTs, absolutely free. Use the presets to add creativity and style to your photos.

Grab the Gradient Tool (G) and pick black color. Click on the thumbnail of this adjustment layer and fill it with solid black color. Then grab the Brush Tool (B), select soft round brush and pick white color. Paint over the right side of the wall.

Step 23 - Red T-Shirt
To make the man even more visible we'll make him deep red t-shirt. Add new layer on the top of the layers and name it RED T-SHIRT. Grab the brush and pick #FF0000 red color. Now carefully paint over the man's t-shirt. After you're done change the Blending Mode of this layer on Darken.

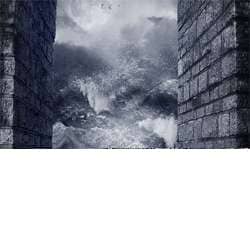
Step 24 - Adding the Moon
Download the picture of the moon and drag it into the manipulation. Name it MOON and place it on the top of the layers. Press Ctrl + T and resize it on proper size. Change the Blending Mode of this layer on Screen which very easily blends the moon with the rest of the image. Screen Blending Mode works on the principle that it makes black color completely invisible and let the white color completely visible. Other color are visible depending on their lightness. This blending mode is also really useful if you blend lens flare. You can reed more about this (and other) blending mode in this article.
But back to the tutorial. To make the moon looking even more realistic lower the opacity of the layer on 70%. It would be also well looking if part of the moon is hidden behind the clouds. To do that add vector mask to this layer. Grab the Brush Tool (B), select soft round brush, pick black color and lower the opacity of the brush on about 40%. Now gently paint over the areas where the moon should be hidden. After this step you manipulation should be similar to the one shown below.

Step 25 - Adding Birds
This is really quick step. Download the bird brushes and install them into the Photoshop. Create a new layer on the top of the layers and name it BIRDS. Grab the Brush Tool (B), select one of the brushes you've just installed, pick some very dark grey or blue color and paint birds similar as on the preview picture.

Step 26 - Reflection under the Man
The man stands in the water. It means he should have some reflections in it. To add them right click on the layer MAN and select Duplicate layer. Place this new layer under the MAN and name it e.g. MAN'S REFLECTION. Change the Blending Mode of the layer on Overlay and lower the Opacity on 30%. Add vector mask, grab the Brush Tool (B), select soft round brush and pick black color. Set the Opacity on 80%. Now paint over the head and body of the reflection. You should get something like this:
4 comments on “Create an Intense Apocalyptic Photo Manipulation”
Great !
this is my version
https://dl-web.dropbox.com/get/My%20Desing/dddddd.png?w=AABKFKWU0NYg1Q9Mqkyr-PaV4kPe3ya5LofvpCm2oBVYbA
tahnks alot
this is all f up...missing instructions
very good but some resources not available ... thanx any way for your excellent tutorial
GREAT!