

Download Lightroom presets and LUTs, absolutely free. Use the presets to add creativity and style to your photos.


Step 20
This stock photo is very bright. Add adjustment layer with Exposure. Then make it clippy by RMB > Create clipping mask.
Step 21
Add Adjustment layer with Color Balance.
Step 22
Add New layer and make it clippy. Choose dark blue color and draw with soft brush strokes on legs and skirt. You will emphasize light source.

Step 23
Again add clipping (RMB > Create clipping mask) adjustment layer with Hue/Saturation. You will make the magic! :)

Step 24
Add adjustment layer with Color Balance. Also make it clippy. Decrease opacity to 57%.
Step 25
It's the last clipping mask on model, good job! Add clippy adjustment layer with Color/Balance.


Step 26
Add new layer. Pick 1px soft brush and use light blue color. Draw outline on the model.
Step 27
Change blending mode to Linear Dodge (Add).
Step 28
Back below model layer (above rendered clouds). On a new layer, with big, soft brush draw shadows below models legs. Use #3b3e4e color.

Step 29
It's time to wings. Everybody use feathers or leather for making wings. You will use thorns! :) Place stock under layer with model. Mask it!
Step 30
As you can see thorns have really big contrast. Fix it. Create adjustment layer with Brightness/Contrast. Make it clippy (RMB > Create Clipping Mask).
Step 31
Add Color/balance layer and make it clippy.
Step 32
With control holding select layer with thorn wings and clipping layers above. Duplicate it (Ctrl + J / Apple + J). Then, from menu Edit pick Transform > Flip horizontal.
Step 33
Add new folder and add new layer. With small brush strokes make outline on wings.


Step 34
Go above all layers. Did you remember light source? It's in the middle of background. Add new layer and with soft brush (with decreased opacity) draw as is shown.

Step 35
Add new layer. With the same - but smaller - brush settings draw shadows on legs. Draw strokes below skirt and on the feets.

Step 36
In my opinion whole image is too bright. Add Hue/Saturation.
Step 37
You will make angels aura. Add new layer. Use big, soft brush with #d3ba6c color. Then draw long stroke above her head.
Step 38
Change blending option to Soft light.
Step 39
Duplicate created layer (Ctrl + J / Apple + J). Transform it (ctrl +T) - make it longer.
Step 40
Again duplicate layer. Then set blending option to Overlay and Opacity to 48%.
Step 41
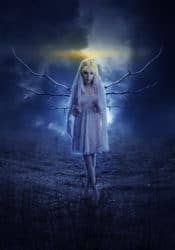
Add new layer. With light-yellow color draw rough circle above her head. With darker yellow add shadows on aura.
5 comments on “How to Create a Beautiful Moonlight Angel Photo Composite”
amazing
Wow, these are really creative! They remind me of those Chip Fosse drawings from Overhauling’. Great work!
Really great tutorial about photo manipulation.
Can't open battle skies pic!!
opens no problem, they are in a zip file