
Make skin look perfect in one-click with these AI-powered Photoshop actions.

Step 19
Now we’ll add the name for the spaceship. Here’s what I typed.

Right click on the layer then choose Rasterize Type.

Step 20
Then choose Edit > Transform > Warp.

Try to reposition and shape the text so that it fits in the beam.

Change the blending mode of the layer to Color Burn and reduce the opacity or fill.

Step 21
To complete the effect, create a new layer then press Ctrl+Alt+Shift+E. This command is called “Stamp Visible”. It is similar to merging all the layers down but instead, it will copy the merged image into your new layer. Duplicate this new layer by pressing Ctrl+J. Select the top one then go to Filter > Artistic > Poster Edges. Apply the settings shown below.

Select the second layer that you just duplicated from then go to Filter > Artistic > Dark Strokes and apply the settings shown below.

Step 22
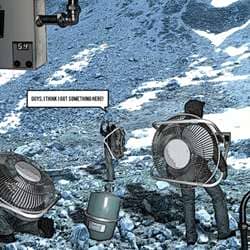
Create a new layer then call it “text balloon”. Use the Pen tool to create a chat box like shown in the image below.

Right click on the path then choose Make Selection.

Choose Edit > Stroke.

Give it a black stroke about 8 px.

Step 23
For the finishing touches, I gave the display for the first model some color. Select the display for the first model then use the Hue/Saturation tool to increase the saturation.

Step 24
Fill the text balloon with white using the Paint Bucket tool (G) to give it a white background. Reduce the opacity or fill to 51%. I also added some text to the oxygen box.

Final Results
![final_600w[1]](https://cdn.photoshoptutorials.ws/images/stories/b80442fea507_14EA9/final_600w1.jpg?strip=all&lossy=1&quality=70&webp=70&avif=70&w=1920&ssl=1 "final_600w[1]")