
Turn any photo into a dot grid artwork with these Photoshop actions. You'll get great results with dots that change size. They get larger in brighter areas and smaller in darker areas. Free download available.
![23[5]](https://cdn.photoshoptutorials.ws/images/stories/6e0d380244c3_B1B4/235.png?strip=all&lossy=1&quality=70&webp=70&avif=70&w=1920&ssl=1 "23[5]")
Step 18 - Adding fabric wraping the body
Make a new layer and use ‘Multiply’ as the 'Blending Option'. Use the paint brush to draw out the torn drapery, as shown below, marked with blue outline. Next, put the marked portion of the girl stock on darken, on the areas marked red.
![24[5]](https://cdn.photoshoptutorials.ws/images/stories/6e0d380244c3_B1B4/245.png?strip=all&lossy=1&quality=70&webp=70&avif=70&w=1920&ssl=1 "24[5]")
Step 19 - Adding more details
Now take the Shimmer drape stock pack and put the marked area of the stock on 'Darken'/'Multiply' 'Blending Option' to make the fabric appear like its folding around the rock.
![25[5]](https://cdn.photoshoptutorials.ws/images/stories/6e0d380244c3_B1B4/255.png?strip=all&lossy=1&quality=70&webp=70&avif=70&w=1920&ssl=1 "25[5]")
The guy image is almost complete. You could add more details to make it more realistic and more interesting, like those shown in the image below. Also, you could erase some parts from the edges to give it a rough outline, which is far more realistic. You could also let some portion of the drapery go beyond the outline, like on the left side, so that it appears wrapped around, and not stuck to it.
![25-2[5]](https://cdn.photoshoptutorials.ws/images/stories/6e0d380244c3_B1B4/25-25.png?strip=all&lossy=1&quality=70&webp=70&avif=70&w=1920&ssl=1 "25-2[5]")
Step 20 - Adjusting light setup
Moving back to the background image, we try and increase the contrast and consequently the depth of the image. Create a new layer, with ‘Soft Light’ 'Blending Option' and paint the areas as shown.
![26[5]](https://cdn.photoshoptutorials.ws/images/stories/6e0d380244c3_B1B4/265.png?strip=all&lossy=1&quality=70&webp=70&avif=70&w=1920&ssl=1 "26[5]")
Step 21 - Adding blur for depth
Create a new layer, go to Image -> Apply image. Now go to Filters -> Blur -> Blur. Now add a layer mask to this layer and erase the parts you want to show nearer to the viewer, i.e. make the closer objects appear sharper. The layer mask of the layer is shown below along with the result.
![27[5]](https://cdn.photoshoptutorials.ws/images/stories/6e0d380244c3_B1B4/275.png?strip=all&lossy=1&quality=70&webp=70&avif=70&w=1920&ssl=1 "27[5]")
![28[5]](https://cdn.photoshoptutorials.ws/images/stories/6e0d380244c3_B1B4/285.png?strip=all&lossy=1&quality=70&webp=70&avif=70&w=1920&ssl=1 "28[5]")
Step 22 - Increasing contrast
Now make a Brightness/Contrast adjustment layer with the shown settings. The layer mask is also shown to give an idea of the areas it is applied to.
![29[5]](https://cdn.photoshoptutorials.ws/images/stories/6e0d380244c3_B1B4/295.png?strip=all&lossy=1&quality=70&webp=70&avif=70&w=1920&ssl=1 "29[5]")
Step 23 - Adding additional rock columns
Now place the guy tied to the rock, which we’ve already made, a bit to the left of the center and put two other similar blocks on the edges. Having an odd number of focal objects in the scene helps the composition greatly while having the main object in the center can be counterproductive. Create a new layer clipped to the guy, with ‘Soft Light’ or ‘Screen’ 'Blending Option' and use the paint brush to bright the right edge of the guy with the rock. This creates a sense of light reflection on the guy, making it more realistic.
![30[5]](https://cdn.photoshoptutorials.ws/images/stories/6e0d380244c3_B1B4/305.png?strip=all&lossy=1&quality=70&webp=70&avif=70&w=1920&ssl=1 "30[5]")
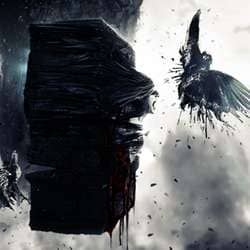
Step 24 - Adding Drips
We add small details to the artwork in this step. First, on a new layer, we draw out dripping liquid on the side rocks, which gives it a more surreal look. Also, we take the stock image of the inverted islands, turn it to grayscale and put it over the mountain behind the guy, to give it a more prominent texture.
4 comments on “Create a Dark and Surreal Photo Manipulation in Photoshop”
This tutorial sucks so much... You forgot to link half the stock photos used, one of the links is broken. You forgott a lot of steps, I jumped adding some stuff because I thought you would explain it later but you didn't.
Your tutorial is bad
and you should feel bad
Thanks :) it was very good tutorial.
Although not much explanation, I really did get a lot off inspiration and ideas here. Especially the part with the rock and the dude with the drapes, just excellent!!
This is a poor tutorial. Not much explanation.