
Make your artwork look like they're from an alternate universe. These Cyberpunk presets work with Photoshop (via the Camera Raw filter) and Lightroom. Download all 788 presets for 90% off.
![31[5]](https://cdn.photoshoptutorials.ws/images/stories/6e0d380244c3_B1B4/315.png?strip=all&lossy=1&quality=70&webp=70&avif=70&w=1920&ssl=1 "31[5]")
Step 25 - Adding leaves
The tiniest of the details are what makes a great artwork. So now, we add random flowing leaves near the guy using the stock leaves/particles brushes and add clouds with the cloud brushes on the left rock.
![32[5]](https://cdn.photoshoptutorials.ws/images/stories/6e0d380244c3_B1B4/325.png?strip=all&lossy=1&quality=70&webp=70&avif=70&w=1920&ssl=1 "32[5]")
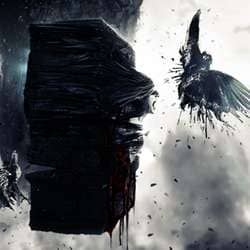
Step 26 - Adding birds and splatter
Next, we add a few birds to the scene. Also, we use splatter brushes to make the birds more interesting and give them a mystique disintegrating look. The splatter brush on itself may look flat, hence we use the bird stock on clipping mask with the splatter brushes.
![33[5]](https://cdn.photoshoptutorials.ws/images/stories/6e0d380244c3_B1B4/335_3.png?strip=all&lossy=1&quality=70&webp=70&avif=70&w=1920&ssl=1 "33[5]")
Step 27 - Adjusting light on birds
Now, we try to further highlight and give details to the birds. Create a new layer on ‘Soft Light’ 'Blending Option' and use the paint brush to roughly highlight the feathers and the structure of the birds. The resultant layer is shown besides the respective bird below.
![34[5]](https://cdn.photoshoptutorials.ws/images/stories/6e0d380244c3_B1B4/345.png?strip=all&lossy=1&quality=70&webp=70&avif=70&w=1920&ssl=1 "34[5]")
Step 28 - Adding dripping blood
Next, we create the dripping blood on the guy tied to the rock. This needs plenty of work to get right but I would skip it here as it has been done quite many times in countless tutorials. Notice that the blood is not shown in grayscale, this helps create focus and makes the whole scene more interesting, similar to effect like in the movie Sin City. To do it, mask out the blood drips and put them above the B&W gradient map layer.
![35[5]](https://cdn.photoshoptutorials.ws/images/stories/6e0d380244c3_B1B4/355.png?strip=all&lossy=1&quality=70&webp=70&avif=70&w=1920&ssl=1 "35[5]")
Step 29 - Using soft light to add details
Create a new layer, go to Edit -> Fill -> 50% gray and put it on ‘Soft Light’ 'Blending Option'. Using the paint brush on low opacity (~10%) draw out the highlights of the scene, with white brush making it lighter and black brush making it darker. The resultant layer is also shown below.
![36[5]](https://cdn.photoshoptutorials.ws/images/stories/6e0d380244c3_B1B4/365.png?strip=all&lossy=1&quality=70&webp=70&avif=70&w=1920&ssl=1 "36[5]")
![37[5]](https://cdn.photoshoptutorials.ws/images/stories/6e0d380244c3_B1B4/375.png?strip=all&lossy=1&quality=70&webp=70&avif=70&w=1920&ssl=1 "37[5]")
Step 30 - Increasing contrast
Create a new ‘Levels’ adjustments layer and use the shown settings. Also, further increase the contrast by using another ‘Brightness/Contrast’ adjustments layer with the layer mask and settings as shown pictorially.
![38[5]](https://cdn.photoshoptutorials.ws/images/stories/6e0d380244c3_B1B4/385.png?strip=all&lossy=1&quality=70&webp=70&avif=70&w=1920&ssl=1 "38[5]")
![39[5]](https://cdn.photoshoptutorials.ws/images/stories/6e0d380244c3_B1B4/395.png?strip=all&lossy=1&quality=70&webp=70&avif=70&w=1920&ssl=1 "39[5]")
![40[5]](https://cdn.photoshoptutorials.ws/images/stories/6e0d380244c3_B1B4/405.png?strip=all&lossy=1&quality=70&webp=70&avif=70&w=1920&ssl=1 "40[5]")
Step 31 - Adding partial vignette
Now we give it a partial vignette kind of effect, only better. We use the ‘Curves’ adjustments layer with the shown settings to darken the image and use the layer mask to only darken the required edges.
![41[5]](https://cdn.photoshoptutorials.ws/images/stories/6e0d380244c3_B1B4/415.png?strip=all&lossy=1&quality=70&webp=70&avif=70&w=1920&ssl=1 "41[5]")
![42[5]](https://cdn.photoshoptutorials.ws/images/stories/6e0d380244c3_B1B4/425.png?strip=all&lossy=1&quality=70&webp=70&avif=70&w=1920&ssl=1 "42[5]")
Step 32 - Gradient map adjustment layer
Create a new ‘Gradient Map’ adjustment layer on ‘Soft Light’ 'Blending Option' and use the values shown for the gradient. You could also mask out the blood drips here to prevent application of this layer on the blood (to get the blood to stay true red), as this gradient causes a shift in color.
4 comments on “Create a Dark and Surreal Photo Manipulation in Photoshop”
This tutorial sucks so much... You forgot to link half the stock photos used, one of the links is broken. You forgott a lot of steps, I jumped adding some stuff because I thought you would explain it later but you didn't.
Your tutorial is bad
and you should feel bad
Thanks :) it was very good tutorial.
Although not much explanation, I really did get a lot off inspiration and ideas here. Especially the part with the rock and the dude with the drapes, just excellent!!
This is a poor tutorial. Not much explanation.