
Luminar AI lets you turn your ideas into reality with powerful, intelligent AI. Download the photo editor and see how you can completely transform your photos in a few clicks.
![43[5]](https://cdn.photoshoptutorials.ws/images/stories/6e0d380244c3_B1B4/435.png?strip=all&lossy=1&quality=70&webp=70&avif=70&w=1920&ssl=1 "43[5]")
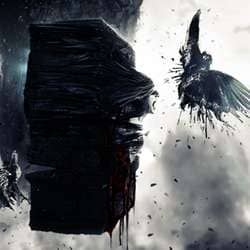
Step 33 - Partial desaturation
The image with the gradient map on 'Soft Light' looks oversaturated, so make a new ‘Black to white’ ‘Gradient Map’ adjustment layer on ‘Color’ 'Blending Option' at 30% opacity. Also, there are places on the bottom left and right corners where the image is too black. Make a new layer with 'Lighten' 'Blending Option' and use the paint brush with #071922 color and use the brush in those corners. And there you have it, the final image.
![44[5]](https://cdn.photoshoptutorials.ws/images/stories/6e0d380244c3_B1B4/445.png?strip=all&lossy=1&quality=70&webp=70&avif=70&w=1920&ssl=1 "44[5]")
Step 34 (Optional) - Optical flares
You could add some custom optical flares to add a more interesting look. The ones used here are a part of the Video Copilot’s Optical Flares Bundle which cannot be shared publicly. Notice though, that the optical flares are different in color than the whole scene, this adds more ‘color’ appeal and makes it look more interesting.
![45[5]](https://cdn.photoshoptutorials.ws/images/stories/6e0d380244c3_B1B4/455.png?strip=all&lossy=1&quality=70&webp=70&avif=70&w=1920&ssl=1 "45[5]")
Step 35 - Saving the final result
The image is finally finished, you could add a border and sharpen the image. Go to Filter -> Sharpen -> Smart Sharpen and use the following given values. Then, save it as a PSD file.
- Amount: 130%
- Radius: 1.0
- Remove: Gaussian Blur
- Check the More Accurate
Final Results
![final-result[10]](https://cdn.photoshoptutorials.ws/images/stories/6e0d380244c3_B1B4/final-result10.png?strip=all&lossy=1&quality=70&webp=70&avif=70&w=1920&ssl=1 "final-result[10]")
Download the PSD
Throes Of Perdition by Rockerdish | 13 MB
Authors Comment
![profile[5]](https://cdn.photoshoptutorials.ws/images/stories/6e0d380244c3_B1B4/profile5.jpg?strip=all&lossy=1&quality=70&webp=70&avif=70&resize=125%2C125&ssl=1 "profile[5]") Hi! My name is Ishan Dahiya, from India.I am just a self-proclaimed, self-righteous artist of sorts who lives in an dream and paints with a mouse. You can catch me at deviantart under the username Rockerdish.
Hi! My name is Ishan Dahiya, from India.I am just a self-proclaimed, self-righteous artist of sorts who lives in an dream and paints with a mouse. You can catch me at deviantart under the username Rockerdish.
- Ishan Dahiya
4 comments on “Create a Dark and Surreal Photo Manipulation in Photoshop”
This tutorial sucks so much... You forgot to link half the stock photos used, one of the links is broken. You forgott a lot of steps, I jumped adding some stuff because I thought you would explain it later but you didn't.
Your tutorial is bad
and you should feel bad
Thanks :) it was very good tutorial.
Although not much explanation, I really did get a lot off inspiration and ideas here. Especially the part with the rock and the dude with the drapes, just excellent!!
This is a poor tutorial. Not much explanation.