
Make your artwork look like they're from an alternate universe. These Cyberpunk presets work with Photoshop (via the Camera Raw filter) and Lightroom. Download all 788 presets for 90% off.
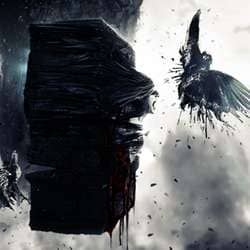
Create this intense photo manipulation with Photoshop. This tutorial will show you how to manipulate stock photos and turn them into this dark and surreal scene. A PSD is included with this tutorial.
Preview of Final Results
![final-result[9]](https://cdn.photoshoptutorials.ws/images/stories/6e0d380244c3_B1B4/final-result9.png?strip=all&lossy=1&quality=70&webp=70&avif=70&w=1920&ssl=1 "final-result[9]")
Dark and Surreal Photo Manipulation Photoshop Tutorial
Avatar, the movie, gave us a beautiful imaginary world with inverted mountains and distinct creatures. We take it to the dark side and turn it into a surreal photo manipulation, inspired also by the Greek legend of Prometheus.
Resources
- Guy's Face
- Body
- Background
- Clouds
- Clouds/Sunset
- Inverted Mountain
- Blood Pack
- Drapery 1
- Drapery 2
- Shimmer Drapery
- Wall Texture
- Crack Texture
- Drip Brushes
- Bird 1
- Bird 2
- Bird 3
- Eagle
- Torn Cloth
- Torn Cloth 2
Step 1 - Starting with the Background Layer
We start off by taking the landscape scene as the starting layer.
![1[5]](https://cdn.photoshoptutorials.ws/images/stories/6e0d380244c3_B1B4/15.png?strip=all&lossy=1&quality=70&webp=70&avif=70&w=1920&ssl=1 "1[5]")
Step 2 - Adding haze
Next, we duplicate the portion shown by red and similar cloudy areas and change the 'Blending Option' to Soft Light and lower the opacity a bit, to around 85%. We move this duplicated layer to the completely black areas like the mountains on the bottom. This creates a mild sense of haze and mist in the totally dark areas.
![2[5]](https://cdn.photoshoptutorials.ws/images/stories/6e0d380244c3_B1B4/25_3.png?strip=all&lossy=1&quality=70&webp=70&avif=70&w=1920&ssl=1 "2[5]")
Resulting effect:
![3[5]](https://cdn.photoshoptutorials.ws/images/stories/6e0d380244c3_B1B4/35.png?strip=all&lossy=1&quality=70&webp=70&avif=70&w=1920&ssl=1 "3[5]")
Step 3 - Using star stock
Next we open up a star stock, any common one would do as we are aiming for a hazy mystic look in the scene. You can even use a nebula stock. Really crank up the contrast of the star stock by either 'Curves' or the 'Brightness/Contrast' adjustment layer and put it on ‘Screen’ Blending mode. Do not bother with the high saturation and distorted color as of yet, which we may have due to high contrast of the star stock, as we would later turn the scene into black and white. Here’s how the stock looks at ‘Screen’ blending mode, 100% opacity, high contrast.
![4[5]](https://cdn.photoshoptutorials.ws/images/stories/6e0d380244c3_B1B4/45.png?strip=all&lossy=1&quality=70&webp=70&avif=70&w=1920&ssl=1 "4[5]")
We duplicate the star stock and erase all unwanted parts like the edges of the stock.
![5[5]](https://cdn.photoshoptutorials.ws/images/stories/6e0d380244c3_B1B4/55.png?strip=all&lossy=1&quality=70&webp=70&avif=70&w=1920&ssl=1 "5[5]")
Now as we can see, the colors are totally messed up. So, we flatten the image and go to Image -> Adjustments -> Desaturate or press Ctrl+Shift+U. And here we have a not-yet-complete shady and surreal landscape. You could also just use a Black to White ‘Gradient Map’ adjustment layer on top of all layers on ‘Color’ 'Blending Option' to turn the image to greyscale.
![6[5]](https://cdn.photoshoptutorials.ws/images/stories/6e0d380244c3_B1B4/65_3.png?strip=all&lossy=1&quality=70&webp=70&avif=70&w=1920&ssl=1 "6[5]")
Step 4 - Making the artwork wider
Now, in the age of widescreens, the aspect ratio of the image is not too appealing. So we extend the canvas size and make it wider, keeping in mind that the current image remains at the right most corner. To do this, press Alt+Ctrl+C to go to canvas size, click on the right arrow in the 'Anchor' field and increase the width. Now, to fill up the empty canvas on left, we would duplicate the background layer and erase the unwanted parts. In the following image, the lighter reds are the duplicated mountains and the darker red are the duplicates of the same mountain but inverted. The blue part is just the mirror image of the mountain, duplicated to give the inverted mountain more width.
4 comments on “Create a Dark and Surreal Photo Manipulation in Photoshop”
This tutorial sucks so much... You forgot to link half the stock photos used, one of the links is broken. You forgott a lot of steps, I jumped adding some stuff because I thought you would explain it later but you didn't.
Your tutorial is bad
and you should feel bad
Thanks :) it was very good tutorial.
Although not much explanation, I really did get a lot off inspiration and ideas here. Especially the part with the rock and the dude with the drapes, just excellent!!
This is a poor tutorial. Not much explanation.