Luminar AI lets you turn your ideas into reality with powerful, intelligent AI. Download the photo editor and see how you can completely transform your photos in a few clicks.
In this tutorial, we will be integrating a few images to create a long exposure image of a sunset wherein the subject would be a vintage Volkswagen Buggy partially submerged on water. We will learn how to use Photoshop in creating a pseudo long exposure shot which expensive DSLR’s can only produce. We would also learn how to visualize and create realistic reflections using the image itself through the use of the Transform tool and the Blur tools.
Preview of Final Results

Long Exposure Sunset Photoshop Tutorial
Tutorial Details:
- Program: Adobe Photoshop CS2
- Version: 9
- Difficulty: Medium
- Estimated Completion Time: 1 to 1.5 hours
Resources:
- Sunset S7 Stock Image by LemnosExplorer (Royalty Free License)
- Old Buggie by Michael Vincent Manalo (Royalty Free License)
- Paper Texture 1 by wojtar-stock (Royalty Free License)
Step 1 - Create a new image
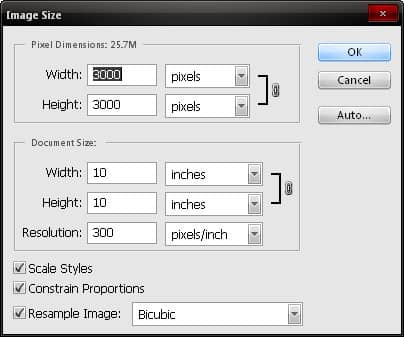
To start off, let’s create a new file, go to the Menu bar and click on File > New and use these settings:
- Width: 3000px
- Height: 3000px
- Resolution: 300 dpi
- Color Mode: RGB Color; 8bit
- Background Contents: Transparent

Step 2 - Create the background
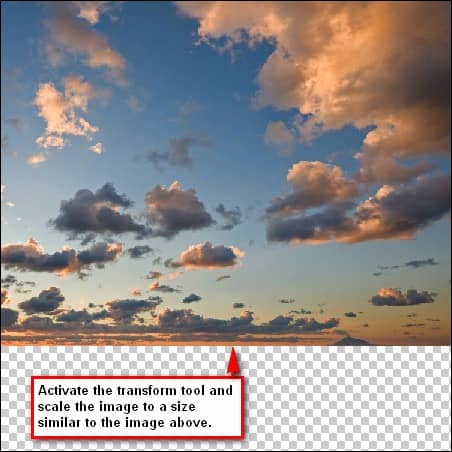
The first step in creating our background is the creation of the sky. Open “Sunset S7 Stock Image “from the folder you’ve saved it into and then drag it to our canvas by using the Move tool (V). With the image on the canvas, click on the layer and then rename it to “sky”. To rename a layer, just double click on the word “layer 1” and you will be able to rename that layer. After that, activate your Transform tool by pressing Ctrl/Cmd + T and transform the image as seen below:

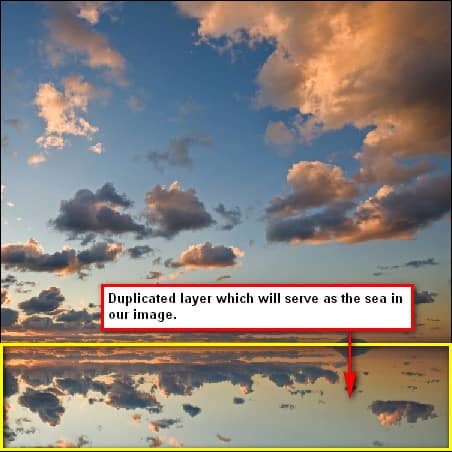
Now let’s create the sea. This time, we won’t be opening any sea stock image, for we would still be using the “Sunset S7 Stock Image “. Duplicate that layer by pressing Ctrl/Cmd + J and then activate your transform tool; right click on the image to bring up the contextual menu of the transform tool. As soon as the menu is shown, click on Flip Vertical which should create an illusion of reflection. This layer would serve as the sea. Rename that layer now to “sea”.

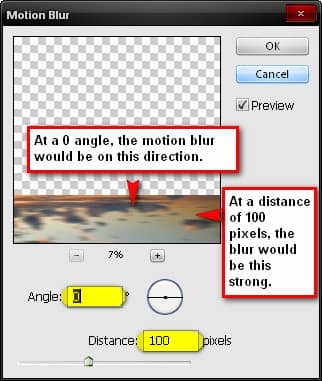
Our aim here is to create a pseudo long exposure shot, so we will be applying blur filter effects to produce the desired effect. First, click on the “sea” layer. With that selected, go to the Menu bar and click on Filter > Blur > Motion Blur and input these settings:
- Angle: 0’
- Distance: 100px

Now click on the “sky” layer and duplicate it; input the same blur filter settings like we used above. Note: When you apply the blur tool on the sky image, the image will be reduced since the Motion Blur technically resizes that image and in turn stretches its overall size. Duplicating the image would fill those missing regions when the Motion Blur effect has been applied.


3 comments on “How to Create A Long Exposure Sunset Image Using Photoshop”
Perfect
Gr8
WoooW !!
This is fantastic not only the image but the processes. Totally awesome. Thanks very much !!!!