
Make skin look perfect in one-click with these AI-powered Photoshop actions.
Click the Sky 17 and then click V to activate the Move Tool. Left-click the image and drag the image to the main canvas and change layer name to "Sky".
![34[4]](https://cdn.photoshoptutorials.ws/images/stories/228f99bcad8e_11F95/344.jpg?strip=all&lossy=1&quality=70&webp=70&avif=70&w=1920&ssl=1 "34[4]")
The result should be similar to this:
![35[4]](https://cdn.photoshoptutorials.ws/images/stories/228f99bcad8e_11F95/354.jpg?strip=all&lossy=1&quality=70&webp=70&avif=70&w=1920&ssl=1 "35[4]")
Change the layer mode to "Overlay".
![36[4]](https://cdn.photoshoptutorials.ws/images/stories/228f99bcad8e_11F95/364.jpg?strip=all&lossy=1&quality=70&webp=70&avif=70&w=1920&ssl=1 "36[4]")
Reduce the opacity to 65% .
![37[4]](https://cdn.photoshoptutorials.ws/images/stories/228f99bcad8e_11F95/374.jpg?strip=all&lossy=1&quality=70&webp=70&avif=70&w=1920&ssl=1 "37[4]")
The result should be similar to this:
![38[4]](https://cdn.photoshoptutorials.ws/images/stories/228f99bcad8e_11F95/384.jpg?strip=all&lossy=1&quality=70&webp=70&avif=70&w=1920&ssl=1 "38[4]")
Now activate Erase tool (E) with these settings Now let's erase :
- Brush size: 400px
- Hardness: 0%
- Opacity: 40%
- Flow: 100%
![39[4]](https://cdn.photoshoptutorials.ws/images/stories/228f99bcad8e_11F95/394.jpg?strip=all&lossy=1&quality=70&webp=70&avif=70&w=1920&ssl=1 "39[4]")
The result should be similar to this:
![40[4]](https://cdn.photoshoptutorials.ws/images/stories/228f99bcad8e_11F95/404.jpg?strip=all&lossy=1&quality=70&webp=70&avif=70&w=1920&ssl=1 "40[4]")
Now create a Brightness/Contrast adjustment layer which can be found by pressing on the Create New Fill/Adjustment layer button shown on the layer window Press Alt+left click in between 2 layer's ("Sky" layer and Brightness/Contrast) to make a mask.:
When the Brightness/Contrast box opens, input the following:
![41[4]](https://cdn.photoshoptutorials.ws/images/stories/228f99bcad8e_11F95/414.jpg?strip=all&lossy=1&quality=70&webp=70&avif=70&w=1920&ssl=1 "41[4]")
The result should be similar to this:
![42[4]](https://cdn.photoshoptutorials.ws/images/stories/228f99bcad8e_11F95/424.jpg?strip=all&lossy=1&quality=70&webp=70&avif=70&w=1920&ssl=1 "42[4]")
Now create a Curves adjustment layer which can be found by pressing on the Create New Fill/Adjustment layer button shown on the layer window Press Alt+left click in between 2 layer's ("Sky" layer and Curves) to make a mask.:
When the Curves box opens, input the following:
![43[4]](https://cdn.photoshoptutorials.ws/images/stories/228f99bcad8e_11F95/434.jpg?strip=all&lossy=1&quality=70&webp=70&avif=70&w=1920&ssl=1 "43[4]")
The result should be similar to this:
![44[4]](https://cdn.photoshoptutorials.ws/images/stories/228f99bcad8e_11F95/444.jpg?strip=all&lossy=1&quality=70&webp=70&avif=70&w=1920&ssl=1 "44[4]")
Now create a Brightness/Contrast adjustment layer which can be found by pressing on the Create New Fill/Adjustment layer button shown on the layer window Press Alt+left click in between 2 layer's ("Sky" layer and Brightness/Contrast) to make a mask.:
When the Brightness/Contrast box opens, input the following:
![45[4]](https://cdn.photoshoptutorials.ws/images/stories/228f99bcad8e_11F95/454.jpg?strip=all&lossy=1&quality=70&webp=70&avif=70&w=1920&ssl=1 "45[4]")
The result should be similar to this:
![46[4]](https://cdn.photoshoptutorials.ws/images/stories/228f99bcad8e_11F95/464.jpg?strip=all&lossy=1&quality=70&webp=70&avif=70&w=1920&ssl=1 "46[4]")
Now activate Brush tool (B) with these settings Now let's Paint :
- Brush size: 200px
- Hardness: 0%
- Opacity: 40%
- Flow: 100%
- Color: #FFFFF
![47[4]](https://cdn.photoshoptutorials.ws/images/stories/228f99bcad8e_11F95/474.jpg?strip=all&lossy=1&quality=70&webp=70&avif=70&w=1920&ssl=1 "47[4]")
The result should be similar to this:
![48[4]](https://cdn.photoshoptutorials.ws/images/stories/228f99bcad8e_11F95/484.jpg?strip=all&lossy=1&quality=70&webp=70&avif=70&w=1920&ssl=1 "48[4]")
Again activate Brush tool (B) with these settings Now let's Paint :
- Brush size: 600px
- Hardness: 0%
- Opacity: 40%
- Flow: 100%
- Color: #FFFFF
![49[4]](https://cdn.photoshoptutorials.ws/images/stories/228f99bcad8e_11F95/494.jpg?strip=all&lossy=1&quality=70&webp=70&avif=70&w=1920&ssl=1 "49[4]")
The result should be similar to this:
![50[4]](https://cdn.photoshoptutorials.ws/images/stories/228f99bcad8e_11F95/504.jpg?strip=all&lossy=1&quality=70&webp=70&avif=70&w=1920&ssl=1 "50[4]")
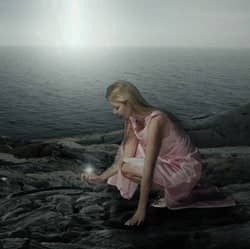
Step 5: Fix girl
First off, let's open the girl stock in Photoshop. We will be using the sea from this stock image so we will need to transfer it to our main canvas.
![51[4]](https://cdn.photoshoptutorials.ws/images/stories/228f99bcad8e_11F95/514.jpg?strip=all&lossy=1&quality=70&webp=70&avif=70&w=1920&ssl=1 "51[4]")
Click the girl and then click p to activate the Pen Tool and make a selection around the girl and drag the image to the main canvas and change layer name to "girl".
![52[4]](https://cdn.photoshoptutorials.ws/images/stories/228f99bcad8e_11F95/524.jpg?strip=all&lossy=1&quality=70&webp=70&avif=70&w=1920&ssl=1 "52[4]")
The result should be similar to this:
![53[4]](https://cdn.photoshoptutorials.ws/images/stories/228f99bcad8e_11F95/534.jpg?strip=all&lossy=1&quality=70&webp=70&avif=70&w=1920&ssl=1 "53[4]")
Next, activate the Transform tool (Ctrl/Cmd +T), then while the "girl" layer is selected and then resize it as shown below:
4 comments on “Create this Magical Light Beam Photo Manipulation in Photoshop”
Great tutorials.Simple and straightforward. I've been looking for something like this for a while. Many thanks!Awesome! Excellent tutorial.
Great tutorials.Simple and straightforward. I've been looking for something like this for a while. Many thanks!
Color #fffff is Cyan not White. White is #ffffffff
I liked this tutorial but my student's found it a little difficult to follow as you sometimes call your layers and photos by the wrong name.
There are times when you tell us to work on one layer but you switch to another layer without telling us that the new layer needs to be selected. Otherwise a good tutorial and my students enjoyed it.
110% work, thanx for inspiration and sharing