Luminar AI lets you turn your ideas into reality with powerful, intelligent AI. Download the photo editor and see how you can completely transform your photos in a few clicks.
![12a[4] 12a[4]](https://cdn.photoshoptutorials.ws/images/stories/a82820618e4b_137FC/12a4.jpg?strip=all&lossy=1&quality=70&webp=70&avif=70&w=1920&ssl=1)
Change it's Layer mode to "Darken".
![13[4] 13[4]](https://cdn.photoshoptutorials.ws/images/stories/a82820618e4b_137FC/134.jpg?strip=all&lossy=1&quality=70&webp=70&avif=70&w=1920&ssl=1)
The result should be similar to this:
![13a[4] 13a[4]](https://cdn.photoshoptutorials.ws/images/stories/a82820618e4b_137FC/13a4.jpg?strip=all&lossy=1&quality=70&webp=70&avif=70&w=1920&ssl=1)
Step 4: Create sky
First off, let’s open the Ol' Buttermilk Sky stock in Photoshop. We will be using the sky on this stock image so we will need to transfer it to our main canvas.
Click the Ol' Buttermilk Sky and press V to activate the Move Tool. Left-click the image and drag the image to the main canvas.
Once you have it there, press Ctrl/Cmd + T to activate the Free Transform command and scale the image so that it’s the same size as our canvas. Change layer name to "Sky".
![14[4] 14[4]](https://cdn.photoshoptutorials.ws/images/stories/a82820618e4b_137FC/144.jpg?strip=all&lossy=1&quality=70&webp=70&avif=70&w=1920&ssl=1)
Next, activate the Eraser tool (E). We're going to make the "sky" blend in with the atmosphere stoke. Input the following for the Eraser tool (E):
- Brush size: 200px
- Hardness: 0%
- Opacity: 65%
- Flow: 100%
Make sure that you've zoomed in to the image to at least 50% so that you can clearly erase and layer mode to "Multiply". Now, let's erase highlighted areas:
![14a[4] 14a[4]](https://cdn.photoshoptutorials.ws/images/stories/a82820618e4b_137FC/14a4.jpg?strip=all&lossy=1&quality=70&webp=70&avif=70&w=1920&ssl=1)
The result should be similar to this:
![15[4] 15[4]](https://cdn.photoshoptutorials.ws/images/stories/a82820618e4b_137FC/154.jpg?strip=all&lossy=1&quality=70&webp=70&avif=70&w=1920&ssl=1)
Step 5:Create Light source :
In this step, we will add a source light to our image . To start, create a new layer (Ctrl/Cmd + Shift + N) and name it "source light". Now, activate the Brush tool (B) and open the brush set: "Star Brushes" by kuschelirmel-stock. To load them, simply, right click on our canvas through any layer and then click on the drop-down button as shown below:
![16[6] 16[6]](https://cdn.photoshoptutorials.ws/images/stories/a82820618e4b_137FC/166.jpg?strip=all&lossy=1&quality=70&webp=70&avif=70&w=1920&ssl=1)
This will prompt the contextual menu to pop up and once you see that, just click on Load Brushes.
![16a[6] 16a[6]](https://cdn.photoshoptutorials.ws/images/stories/a82820618e4b_137FC/16a6.jpg?strip=all&lossy=1&quality=70&webp=70&avif=70&w=1920&ssl=1)
You will now be prompted to this directory: Adobe Photoshop > Presets > Brushes so make sure that you have put the brushes within this folder. Now locate the brush set and click OK. Right click on the canvas again using your Brush tool (B) and now you'll notice that you have lightning brushes. Now, let's choose a brush:
![17[4] 17[4]](https://cdn.photoshoptutorials.ws/images/stories/a82820618e4b_137FC/174.jpg?strip=all&lossy=1&quality=70&webp=70&avif=70&w=1920&ssl=1)
With that brush selected, input the following brush settings for it:
- Brush size: 2200px
- Hardness: Default
- Opacity: 100%
- Flow: 100%
- #: dff9ff
This is the brush color we would be using:
![17a[6] 17a[6]](https://cdn.photoshoptutorials.ws/images/stories/a82820618e4b_137FC/17a6.jpg?strip=all&lossy=1&quality=70&webp=70&avif=70&w=1920&ssl=1)
Now, let's paint in the Source light in highlighted areas:
![18[4] 18[4]](https://cdn.photoshoptutorials.ws/images/stories/a82820618e4b_137FC/184.jpg?strip=all&lossy=1&quality=70&webp=70&avif=70&w=1920&ssl=1)
The result should be similar to this:
![19[4] 19[4]](https://cdn.photoshoptutorials.ws/images/stories/a82820618e4b_137FC/194.jpg?strip=all&lossy=1&quality=70&webp=70&avif=70&w=1920&ssl=1)
Step 6: Create Tree
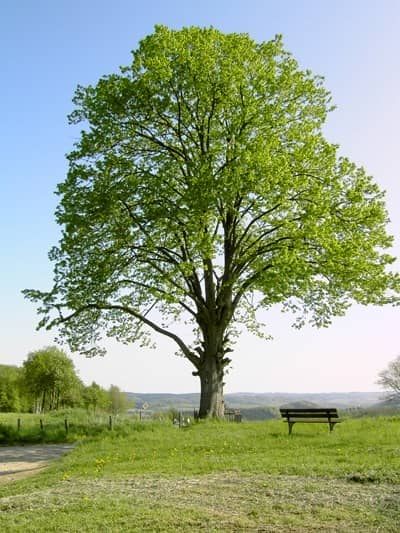
Let's first open old tree by stock.xchng .

Now we needs only tree from the whole stoke.We can do it by "pen tool" or "Polygonal Lasso tool (L)" but they are very time consuming so ,i am doing it by using "color range tool".It's a very easy and quick process.


3 comments on “Create a Moody Landscape Photo Manipulation in Photoshop”
No
good ! Thank you ~:)
nice tutorial