
Download Lightroom presets and LUTs, absolutely free. Use the presets to add creativity and style to your photos.

You need to blend the layer properly with the rest of the image. It means to make it lighter and create soft transition between this layer and the rest of the image.
Let's start with lightening. It's really quick and easy - just lower Opacity of the layer on 50%.

To create the soft transition add layer mask to the layer COVER SUN. Grab the Brush Tool (B), select some soft round brush and pick black color. Paint till you get something similar to the picture below.

As you can see the layer COVER SUN has less blue tones than the rest of the image which doesn't look realistic. To fix it add new adjustment layer Color Balance above the COVER SUN and set it as on the following picture.

Because you want to affect only COVER SUN and not the rest of the image create clipping mask from the adjustment layer Color Balance.
Step 7 - Adjusting the Background
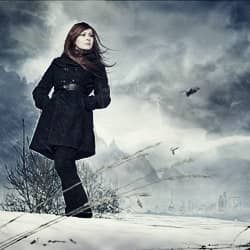
You want to create dramatic atmosphere in this picture. In many cases drama means contrast and this image is no exception. Mountains in the background don't have that "drama look" but you'll create it in this step.
Add new adjustment layer Selective Color on the top of all layers and set it as can be seen on the picture below.

Right now Selective Color adjusts also the woman and it doesn't look nicely. You need to hide the adjustment on her. To do that go to Select > Load Selection... and from Channels choose Woman. It activates the mask of woman.
Grab the Brush Tool (B), pick black color and paint on the layer mask in the selection.
Whole picture would look better if it's less saturated. You can easily fix it by adding new adjustment layer Hue/Saturation on the top of all layers and setting the value Saturation on -25.
After this step your manipulation should look like this one.

Step 8 - Lights and Shadows on Woman
Let's focus on increasing contrast on the woman. If you have tablet this step is easier but you can do it with mouse too without any bigger problems. To increase the contrast you'll use two adjustment layers Levels - one for increasing highlights and one for shadows.
Let's start with highlights. Add new adjustment layer Levels on the top of all layers and set the Input Levels on 0; 2,96; 255. Change its Blending Mode on Luminosity because you don't want to it affects colors, only lights.
10 comments on “Create a Mysterious Fashion Photo Manipulation in Photoshop”
Thanks for stopping by!I use Lightroom and Photoshop for my pp'ing. I'm rlleay just learning still have found some actions that I like that I have actually rlleay learned a lot from using.
struck in first step...plz tell me how u remove cloth and retain the straw..plz mail me the solution so that i can go for second step
And here's mine:
http://oi59.tinypic.com/2c126w.jpg
:)
I used a different mountain - the original is missing.
Alirght alright alright that's exactly what I needed!
Hi,
Great tutorial, thanks.
And this is my result: https://imageshack.com/i/0lh0uxj
I have made snow instead of rain ; )
This is really amazing.. its great. but given model image resoulution is not enough for this type of design. Thanks..
Those were very educational Terence! It was like you took us into atenhor world that we would never see & into the eyes of those that work up in the sky. The shot behind the crane operator was awesome and I loved the candid shots that you took. Amazing work my friend! Must have been quite the experience.
amazing. thks!
Thank you very much,I love you !
i liked it very much...thnk u