
Turn any photo into a dot grid artwork with these Photoshop actions. You'll get great results with dots that change size. They get larger in brighter areas and smaller in darker areas. Free download available.
In this tutorial you'll learn how to use different custom brushes to create stormy weather, save your masks to save your time, work with different adjustment layers, and make adjustments only on small parts of the image to achieve the exact result you want. Let's get started!
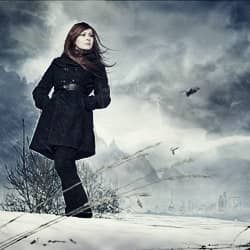
Preview of Final Results

Mysterious Fashion Photo Manipulation Photoshop Tutorial
Resources
Step 1 - Preparation of Background
Download the picture with girl and main ground and open it in Photoshop. The photo was taken with slightly different intention, that's why there is some orange clothing. You'll get rid off that in this step.
Create a new layer above the background. You can find the button "Create a new layer" in the bottom part of the palette Layers. If you don't see this palette simply press F7 on your keyboard or go to Window > Layers and it will appear.

Name the new layer e.g. REMOVE CLOTHING. It's good to name your layers because you can orient better than if you don't do it.
Grab the Brush Tool (B). Press Alt on your keyboard to activate the Eyedropper Tool and pick some light color from the sky. Now start painting over the clothing to make it disappear and let sky appear instead.

You can get the inspiration of where to paint on in the picture above. As I said paint over the clothing but don't paint over the straws! They create nice impression of space so you want to let them in the picture.
Then paint over the bush in the right bottom corner. It doesn't look photogenic and you'll add some better in following steps.
After this step your image should look like the following.

Step 2 - Creating Selection of Woman
As you can see the sky and whole background is very uninteresting right now - it's just some light blue color and nothing more. To improve it you'll add mountains to the background and sky in following steps.
Before you'll start it's necessary to make selection of the girl and save it. To do that grab the Lasso Tool (L) and select the girl.

Be as careful as possible while making the selection. If you don't do it carefully your manips will never look realistic. It can be boring and time consuming but it's totally worth it.
If you're not sure how to use the Lasso Tool (L) or want to know about other methods of blending you can take a look at the article "A Photomanipulator's Guide to Blending" here on Photoshop Tutorials.
10 comments on “Create a Mysterious Fashion Photo Manipulation in Photoshop”
Thanks for stopping by!I use Lightroom and Photoshop for my pp'ing. I'm rlleay just learning still have found some actions that I like that I have actually rlleay learned a lot from using.
struck in first step...plz tell me how u remove cloth and retain the straw..plz mail me the solution so that i can go for second step
And here's mine:
http://oi59.tinypic.com/2c126w.jpg
:)
I used a different mountain - the original is missing.
Alirght alright alright that's exactly what I needed!
Hi,
Great tutorial, thanks.
And this is my result: https://imageshack.com/i/0lh0uxj
I have made snow instead of rain ; )
This is really amazing.. its great. but given model image resoulution is not enough for this type of design. Thanks..
Those were very educational Terence! It was like you took us into atenhor world that we would never see & into the eyes of those that work up in the sky. The shot behind the crane operator was awesome and I loved the candid shots that you took. Amazing work my friend! Must have been quite the experience.
amazing. thks!
Thank you very much,I love you !
i liked it very much...thnk u