

Turn any photo into a dot grid artwork with these Photoshop actions. You'll get great results with dots that change size. They get larger in brighter areas and smaller in darker areas. Free download available.

3) Keeping the text selected reduce the spacing between the letters to -25.

Step 18
In this step we are going to create a carver inscription effect on the tombstone using the text we just created.
1) Select a mask in the shape of the shape of the text and separate the selection into a new layer and name it as 'inscription'.

2) With the inscription layer selected reduce the Exposure to -0.24 and set the Gamma Correction to 0.50.

3) To create the shadow within the inscription duplicate the tombstone layer and convert it into a silhouette using the Levels.

4) Then place the shadow layer in between the Tombstone and the Inscription layers and move it slightly towards the left as shown.

5) With the shadow layer selected go to Filter>Blur>Gaussian Blur and set the Gaussian Blur Radius to 3.0px.

Step 19
As the scene is focused on the main character the objects closer to the scene have to be blurred in order to maintain the Depth Of Field (DOF).
-Merge all the Tombstone layers and go to Filters>Blur>Gaussian Blur and add a Gaussian Blur of Radius 4px.

Step 20
Now by using the Fog Brush paint the fog as shown using black color. This black fog represents the toxic that is destroying the nature.

Step 21
1) Using the technique used in step 11 cut the Dead Tree 2 from its background into a new layer.

2) Now place the dead branches as shown on the left side of the scene.

3) Assuming the branches being near the scene add a Gaussian Blur of Radius 6.1px to maintain the DOF.

4) Similarly add few more dead branches in the scene as shown.

Step 22
In this step we are going to work with the Adjustment Layer to color correct the whole scene.
1) Create and Exposure Adjustment layer on the top of all the layers and set the Gamma Correction to 0.81.

2) Similarly open the Curves Adjustment layer on the top of Exposure layer and set the Curves as shown.

3) Now create an Adjustment Layer of Hue/Saturation and set the Saturation level to -23.

Step 23
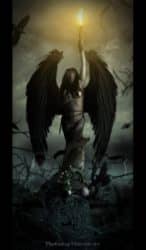
In this step we are going to create the fire on the log that the woman is holding.
1) Import the image of the Fire 1 on to the working canvas and place it as shown. Then set the Blending Mode of the layer to Screen.
11 comments on “Create a Photo Manipulation of an Angel Holding a Torch”
These look fantastic! Thanks for bringing them together – what a great collection
Nice tutorial, but the writer doesn't seem to know the difference between the singular "woman" and the plural "women." VERY annoying.
couldnt download the wings any other place i can go 2 get them
nice tutorial
Merci beaucoup. J'ai utilisé d'autres ailes, je n'avais pas vu le lien rajouté. Ma réalisation: http://www.chez-mireilled.com/article-montage-ange-surrealiste-avec-photoshop-109574026.html
best I could find.
http://browse.deviantart.com/?q=feathers%20psd#/d51864k
i found a wing by searching thru deviart site ... the link was gone even checked he profile for one ... but i got it :) not as perfect as hers but cool
I too am unable to find "wings."
Thank You
The link "wings" doesn't work. Page doesn't exist anymore is the message you get.
me 2 i went to her page and trying to get it the wings