

Make your artwork look like they're from an alternate universe. These Cyberpunk presets work with Photoshop (via the Camera Raw filter) and Lightroom. Download all 788 presets for 90% off.

Step 3 - Adding Castle
This step is really quick and easy. You'll just add castle on one of the mountains in the background to create more fairy tale-ish atmosphere. Download photo of the castle listed in the beginning of the tutorial and drag it into your photo manipulation. Place it on the top of all layers and name it CASTLE. Press Ctrl+T to activate the Free Transform Tool and resize it on proper size. Hold Ctrl on your keyboard while doing it to remain constant proportions.
To blend it properly with the rest of the image cut out the background. Use any method you're comfortable with - e.g. the Lasso Tool (L), the Eraser Tool (E) or the Pen Tool (P). As you can see right now castle is too dark and saturated and doesn't fit well to the rest of the image. Fix it by adding new adjustment layer Hue/Saturation (you can find the button "Add new adjustment layer" next to the "Add layer" button you've used in previous steps). Set the value Saturation on -35 and Lightness on +10.

Right now the adjustment layer affects all layers below itself. But you want to adjust only CASTLE and not the rest of the image. To achieve that right click on the adjustment layer you've just added and select Create Clipping Mask. After this step your photo manipulation should be similar to the one below.

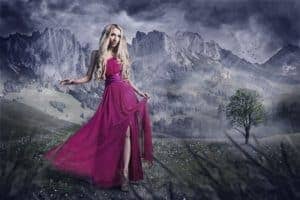
Step 4 - Adding a Woman
Download photo of a woman listed in the beginning of the tutorial and drag in into your photo manipulation. Place it on the top of all layers and name it WOMAN.
To blend this layer properly with the rest of the image you need to do two things. First add shadow under her and second blend the clothing better because now its obvious that the woman was shot in the studio (see white color behind the fabric). In this step you'll add the shadow and in next you'll blend the dress better.
Create new empty layer under WOMAN and name it SHADOW. If you look at the mountains in the background you can see that sun hits them from right side of the image. That is our main light source and shadow of the woman should be casted in the opposite direction.
12 comments on “Create This Striking Fairy Tale Photo Manipulation in Photoshop”
you have done a good work.......
Nice technique. Really useful…thanks for the post…
Cool! Tot luv the tutorial...
Super
thanks for the tutorial
it really helped me :)
Thanks for this tutorial Jarka
Thank you for this tutorial creative well explained.
My realization:
http://www.chez-mireilled.com/article-paysage-conte-de-fee-avec-photoshop-119754637.html
hye
Estupendo, me ha gustado mucho y ya he hecho una prueba. Gracias
nice
Super tut I will have to try this
hey