
Turn any photo into a dot grid artwork with these Photoshop actions. You'll get great results with dots that change size. They get larger in brighter areas and smaller in darker areas. Free download available.
![26[10]](https://cdn.photoshoptutorials.ws/images/stories/78c00660ee68_10D4C/2610.jpg?strip=all&lossy=1&quality=70&webp=70&avif=70&w=1920&ssl=1 "26[10]")
Now , after Hue/Saturation adjustment we can see ,it has take place on the whole canvas but we want's it only on our girl image.So,let press (Alt+ left click)in between of both layer's which are Girl layer and Hue/Saturation layer to make a mask over girl layer.See as below:
![26a[10]](https://cdn.photoshoptutorials.ws/images/stories/78c00660ee68_10D4C/26a10.jpg?strip=all&lossy=1&quality=70&webp=70&avif=70&w=1920&ssl=1 "26a[10]")
Now create a Curves layer which can be found by pressing on the Create New Fill/Adjustment layer button shown on the layer window When the Curves box opens, input the following:
and once again do that masking
![27[10]](https://cdn.photoshoptutorials.ws/images/stories/78c00660ee68_10D4C/2710.jpg?strip=all&lossy=1&quality=70&webp=70&avif=70&w=1920&ssl=1 "27[10]")
The result should be similar to this:
![28[10]](https://cdn.photoshoptutorials.ws/images/stories/78c00660ee68_10D4C/2810.jpg?strip=all&lossy=1&quality=70&webp=70&avif=70&w=1920&ssl=1 "28[10]")
Let's do some retouching with girl.Press P to activate pen tool and then make a selection around girl's dress and then press (ctrl+j) to make a duplicate copy of dress.Name it "Dress".
![29[10]](https://cdn.photoshoptutorials.ws/images/stories/78c00660ee68_10D4C/2910.jpg?strip=all&lossy=1&quality=70&webp=70&avif=70&w=1920&ssl=1 "29[10]")
Now create new color balance adjustment layer from the bottom of layers palette. Press Alt+left click in between 2 layer's (Dress layer and color balance) to make a mask.
![30[10]](https://cdn.photoshoptutorials.ws/images/stories/78c00660ee68_10D4C/3010.jpg?strip=all&lossy=1&quality=70&webp=70&avif=70&w=1920&ssl=1 "30[10]")
Now create new Hue/Saturation adjustment layer from the bottom of layers palette. Press Alt+left click in between 2 layer's (Dress layer and Hue/Saturation) to make a mask.
![31[10]](https://cdn.photoshoptutorials.ws/images/stories/78c00660ee68_10D4C/3110.jpg?strip=all&lossy=1&quality=70&webp=70&avif=70&w=1920&ssl=1 "31[10]")
The result should be similar to this:
![32[10]](https://cdn.photoshoptutorials.ws/images/stories/78c00660ee68_10D4C/3210.jpg?strip=all&lossy=1&quality=70&webp=70&avif=70&w=1920&ssl=1 "32[10]")
Step 6: Add some Moss to snail shell
First off, let’s open the "Moss on concrete" stock in Photoshop. We will be using the Moss from this stock image so we will need to transfer it to our main canvas.
![33[10]](https://cdn.photoshoptutorials.ws/images/stories/78c00660ee68_10D4C/3310.jpg?strip=all&lossy=1&quality=70&webp=70&avif=70&w=1920&ssl=1 "33[10]")
Now open Color range.For that go to Select > Color range.
Put these values as below:
![34[10]](https://cdn.photoshoptutorials.ws/images/stories/78c00660ee68_10D4C/3410.jpg?strip=all&lossy=1&quality=70&webp=70&avif=70&w=1920&ssl=1 "34[10]")
Invert the selection for that press (ctrl+shift+i) and move it to main canvas.
![35[10]](https://cdn.photoshoptutorials.ws/images/stories/78c00660ee68_10D4C/3510.jpg?strip=all&lossy=1&quality=70&webp=70&avif=70&w=1920&ssl=1 "35[10]")
Place the "Moss" stock below of "girl" stock.See as below:
![36[10]](https://cdn.photoshoptutorials.ws/images/stories/78c00660ee68_10D4C/3610.jpg?strip=all&lossy=1&quality=70&webp=70&avif=70&w=1920&ssl=1 "36[10]")
Now activate Erase tool (E) with these settings Now let's erase :
- Brush size: 400px
- Hardness: 0%
- Opacity: 40%
- Flow: 100%
![37a[39]](https://cdn.photoshoptutorials.ws/images/stories/78c00660ee68_10D4C/37a39.jpg?strip=all&lossy=1&quality=70&webp=70&avif=70&w=1920&ssl=1 "37a[39]")
Now let's erase :
![37[10]](https://cdn.photoshoptutorials.ws/images/stories/78c00660ee68_10D4C/3710.jpg?strip=all&lossy=1&quality=70&webp=70&avif=70&w=1920&ssl=1 "37[10]")
Change the layer mode to "Overlay".
The result should be similar to this:
![38[10]](https://cdn.photoshoptutorials.ws/images/stories/78c00660ee68_10D4C/3810.jpg?strip=all&lossy=1&quality=70&webp=70&avif=70&w=1920&ssl=1 "38[10]")
Now create new Hue/Saturation adjustment layer from the bottom of layers palette. Press Alt+left click in between 2 layer's (Dress layer and Hue/Saturation) to make a mask.
![39[10]](https://cdn.photoshoptutorials.ws/images/stories/78c00660ee68_10D4C/3910.jpg?strip=all&lossy=1&quality=70&webp=70&avif=70&w=1920&ssl=1 "39[10]")
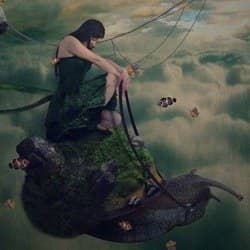
The result should be similar to this:
![40[10]](https://cdn.photoshoptutorials.ws/images/stories/78c00660ee68_10D4C/4010.jpg?strip=all&lossy=1&quality=70&webp=70&avif=70&w=1920&ssl=1 "40[10]")
Step 7: Add rocks in shell
First off, let’s open the "rocks 2" stock in Photoshop. We will be using the rock from this stock image so we will need to transfer it to our main canvas.
Click the "rocks 2" and press P to activate pen tool and then make a selection around the rock and then click V to activate the Move Tool. Left-click the image and drag the image to the main canvas and change layer name to "rock 1".
8 comments on “Create a Surreal Scene with a Cool Snail that Flies”
Half the links don't work.
What a shitty tutorial. No mention of why any of the steps are done. Just bullshit "input these values". Thanks for nothing asshole.
Nice and useful! Well done, thank you.
Sorry , I was thinking in Greek ... i meant helpful ...
There are broken links in photos( and there is no PSD file of the tutorial( can you, please, add?
Hello,
there are some broken links, can u fix please?!
theres a couple of broken links :(
good job,thanks.