
Turn any photo into a dot grid artwork with these Photoshop actions. You'll get great results with dots that change size. They get larger in brighter areas and smaller in darker areas. Free download available.

Step 15
Usually when we remove the ice from the freezer we find frost smoke emitting from them. Hence we are going to add the same effect here.
- Using the Smoke Brush paint white smoke around the ice cube.

2) Now using the smoke brush create smoke coming from the women’s hand to illustrate that the cube is formed by the aura power of the women.

Step 16
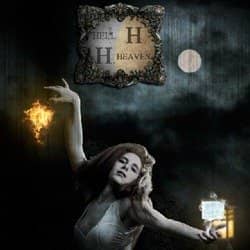
In this step we are going to create a fire ball on the other side of the women. Here fire represents hell.
- Import the image of the Fire on to the canvas and erase it in circular shape using the Eraser Tool (E).
-You can even use a Circular Mask (M) with feather 24px and erase the image in circular shape.

2) Now import another image of fire on to the canvas and set the blending mode of the layer to Screen and place it as shown.

3) Similarly complete the fire ball as shown using multiple fire images.

4) In this step we will be creating a glow to the fire ball. Using the Soft Round Brush paint the color #f4b906 as shown above the fire ball and set the Blending Mode of the layer to Screen and lower the Opacity of the layer to 20%.


Step 17
In this step we are going to create the lanterns floating in the air which represents the light of hope in this theme.
- Mask out the image of the Lanterns into a new layer using the Lasso Tool (L).

2) Now import the Lantern on to the working canvas and place it near the women as shown.

3) We need to de-saturate the colors of the lantern to blend with the environment. With the Lantern layer selected go to Image>Adjustments>Hue/Saturation and reduce the Saturation=-64, and Lightness=-5.

Step 18
In this step we are going to create the light in the Lantern. While painting the light we will be going from dark to lighter colors.
- Select a mask in the shape of the glass of the lantern and fill the color #da8c05.

2) Now paint with the lighter shade of yellow i.e. #e2c003.

3) The main source of light always appears brighter hence paint with white color in the center as shown to represent the light source in the lantern.

4) Now set the Blending Mode of the Light layer to Overlay to retain the texture of the lantern which make it look natural.

5) To create the light glows to the lantern paint the color #d5bb78 as shown. Then set the Blending Mode of the Glow Layer to Screen and reduce the Opacity to 23%.


Step 19
Similarly following the step18 create few more Lanterns in the scene.
2 comments on “Create this “Heaven & Hell” Photo Manipulation”
amazing!! great to see the amazing work of great experienced art directors!!
Great! excellent Job Men