
Make skin look perfect in one-click with these AI-powered Photoshop actions.

Next, let's create its reflection on the water. To start, open "57" by annerireSTOCK again and activate the Polygonal Lasso Tool (L) and create a selection area as shown on the image below:

Activate the Move tool (V) and drag the selected area to the canvas. Rename it to "platform reflection". Position it as shown on the image below:

Note: Make sure that that layer is on top of the "platform" layer.
Activate the Transform tool (Ctrl/Cmd + T) and resize the image. See image below:

The result:


Now, we will blend this reflection to the water to make it seamless. Activate the Eraser tool (E) and input the following:
- Brush size: 70px
- Hardness: 0%
- Opacity: 100%
- Flow: 100%
Now, let's erase!

After erasing, reduce the "Platform" layer's Opacity to 95%.

The result of erasing and reducing the Opacity:

Select all the layers we handled in this step and group them. Rename this group to "Platforn".
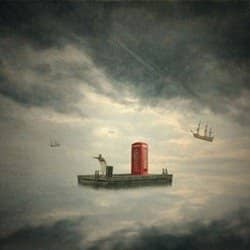
Step 5: Add the Phone Booth
Now, in this step, we will be adding a phone booth on the platform. Now, let's get started - open "phone booth" by digital amphetamine and create a selection area using the Magnetic Lasso Tool (L).


When you're done, activate the Move tool (V) and move this layer to our canvas. Once on the canvas, rename this layer to "phone booth". Position the phone booth on this area:

Now, activate the Transform tool (Ctrl/Cmd + T) and resize the phone booth as shown on the image below:

Next, let's adjust the Brightness/Contrast of this layer. Make sure this layer is active and then go to Image > Adjustments > Brightness/Contrast and input the following:
- Brightness: -53
- Contrast: -30
- Use Legacy: Uncheck

The result:

Now, we will remove that distracting plant on the booth's lower area. To do that, we will need to activate the Clone Stamp tool (S). Once activated, input the following:
- Brush size: 20px
- Hardness: 0%
- Opacity: 100%
- Flow: 100%
Now, in order for us to clone properly, we'll need to zoom in to the image, zoom in by pressing Z on your keyboard and left-clicking on the canvas or you could set the zoom level to 100% on the Navigator window. See image below:


The result of that should be similar to this:

After that, let's now darken the phone booth to make it blend well with the rest of the images. To start, create a new layer (Ctrl/Cmd + Shift + N) and name it "Darken". Put this layer above the "phone booth" layer.
Now, click on the "Darken" layer and right click on it to show the contextual menu. Once the menu is shown, click on "Create Clipping Mask".
3 comments on “How to Create a Traditional Painting-Like Surreal Image using Photoshop”
boy
cool
swag