
Turn any photo into a dot grid artwork with these Photoshop actions. You'll get great results with dots that change size. They get larger in brighter areas and smaller in darker areas. Free download available.

Now, reduce this layer's Opacity to:
- Opacity: 60%
The result:

When you're done, select all these layers and then group them. Name the group to "Ships".
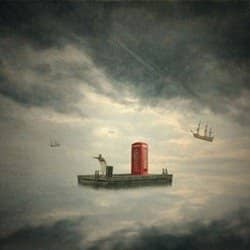
Step 8: Add Textures
Now, let's add some textures to our image to give it a grungy feel. To start, let's open "Texture 119" by Sirius_sdz. Activate the Move tool (V) and drag this to our canvas. Make sure you put it on top of the "Ships" group. Rename this layer to "Texture 1".
Position it as shown on the image below:

Now, activate the Transform tool (Ctrl/Cmd + T) and resize it as shown below:

The result:

Next, let's change the Blending mode and Opacity of this texture:
- Blending Mode: Soft Light
- Opacity: 40%
The result:

Let's now add the next texture - open "Texture 54" by night-fate-stock. Activate the Move tool (V) and drag it to our canvas. Rename to "Texture 2". Position it here:

Next, activate the Transform tool (Ctrl/Cmd + T) and resize it as shown below:

Now, change Blending mode and Opacity of this texture:
- Blending Mode: Soft Light
- Opacity: 40%
The result:

Next, open "Metal Texture 15" by wojtar stock. Move it to the canvas using the Move tool (V). Once there, rename it to: "Texture 3". Position it as shown below:

Activate the Transform tool (Ctrl/Cmd + T) and resize it as shown below:

Now, change Blending mode and Opacity of this texture:
- Blending Mode: Soft Light
- Opacity: 100%
The result:

Next, open "Paper Texture 1" by Wojtar Stock. Move it to the canvas using the Move tool (V). Once there, rename it to: "Texture 4". Position it as shown below:

Resize it using the Transform tool (Ctrl/Cmd + T) as shown below:

Now, let's change the Blending mode and Opacity of this texture:
- Blending Mode: Overlay
- Opacity: 40%
- Fill: 70%
The result:


Group all those layers, and rename the group to "Textures".
Step 9: Create a Vignette
In this step, we will learn how to create a vignette which will help enhance the focus on our subject.
To start, go to the Menu bar and click on File > New and use the same settings we used to create our canvas. (Refer to Step 1).
Take note, the background contents should be: WHITE
Once it has been created, go to Filter > Distort > Lens Correction. Find the tab Vignette and use these settings:
- Vignette amount: -100
- Midpoint: +50

Now that that's done drag the vignette to our canvas using the Move tool (V) and put it on top of all the layers that we've created, and then set the following:
3 comments on “How to Create a Traditional Painting-Like Surreal Image using Photoshop”
boy
cool
swag