
Make your artwork look like they're from an alternate universe. These Cyberpunk presets work with Photoshop (via the Camera Raw filter) and Lightroom. Download all 788 presets for 90% off.
- Brush size: 2
- Brush Detail: 8
- Texture: 1

The result of that will be like this:

But that doesn't look too good because the details are lost so we should reduce its Opacity to:
- Opacity: 40%
The result:

Select both layers and right click on any of them and click Flatten Image.
Step 12: Add some Lighting Effects
Now, for our final step, let's enhance the lighting of this image .We're going to put the focus of our viewers to the subjects of our image - the girl and the phone booth. To do that, first, duplicate the image (Ctrl/Cmd + J) and then go to Filter > Render > Lighting Effects. When it opens, input the following:
- Style: Default
- Light Type: Omni
- On: Check
- Intensity: 21

After that, reduce the Opacity of that layer to:
- Opacity: 70%
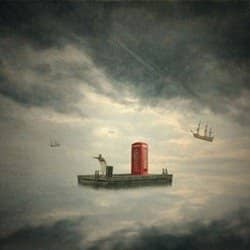
The result of that would be:

Authors Comment
 I am a huge fan traditional artworks and themes, but I'm a frustrated one so I tried making one through Photoshop. I hope you'd enjoy creating this tutorial and I hope this would help you in whatever you're doing. Anyway, thank you for visiting this page and using my tutorial, if you want to see more of my art works, give me a shout at my website: https://www.wix.com/theflickerees/michaelVmanalo
- Michael Vincent Manalo
3 comments on “How to Create a Traditional Painting-Like Surreal Image using Photoshop”
boy
cool
swag