

Luminar AI lets you turn your ideas into reality with powerful, intelligent AI. Download the photo editor and see how you can completely transform your photos in a few clicks.
.

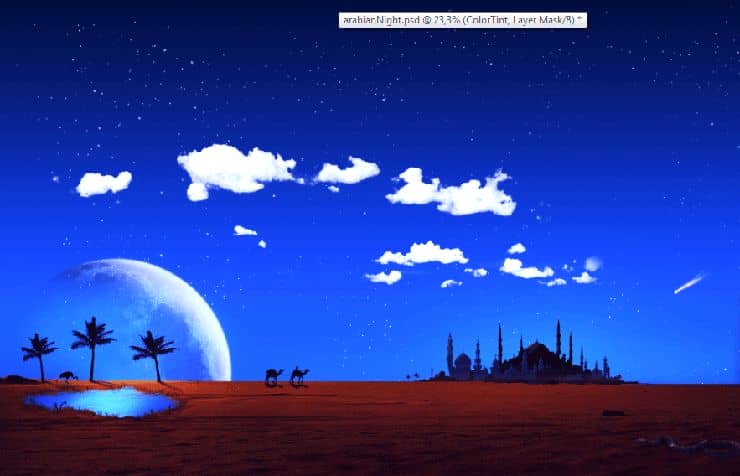
Step 11
Now let’s create the terrain. Open file “Desert” and using the quick selection tool select the terrain only (not the sky). Copy and paste the terrain into our document. As you already guess now you should right click the desert layer and convert it to a smart object. Resize it and position the terrain as shown below. If your selection was imperfect feel free to add a layer mask and mask the
unwanted bits.

Step 12
In this step and the following steps we will apply some adjustment layers to the desert layer in order to blend it better with our image. Usually almost any imported/pasted layer is often more saturated than the rest of the composition (not only in this case but in general) so let’s add a Hue/Saturation Adjustment layer and tweak with the values. We notice that the terrain looks much better if we decrease slightly the saturation. But in order to apply the effect only to the terrain layer we must clip the Hue/Saturation to the Desert layer by Alt-clicking between the two ( and we will do so for the rest of the adjustment layers applied to the terrain). If you notice the a group called City and wonder why you don’t have it don’t worry about it, you will find out why in the future steps.


Step 13
Now let’s color correct the terrain a bit. Add a curve adjustment layer and use the settings shown below. Clip this layer to the layer below (it should be clipped to a Hue/Saturation layer which in turn is clipping the desert layer). Lower the opacity to 32%.


Step 14
Now let’s add some selective lighting. We will make the foreground part of the terrain darker. Add a curves adjustment layer and drag the curve down to darken. Click on the layer mask and with a black brush paint on the top part of the terrain to keep it untouched by the darkening effect. Lower the opacity until you achieve a pleasant effect (40%). Clip the layer to the layer below.


Step 15
And as a last adjustment layer applied to the desert create a Brightness/Contrast layer and drag the Contrast slider to the right until a value of 70 is reached. Clip the layer to the layer below.


Step 16
Group the terrain layer and the all the adjustment layers we applied to it into a new group.

Step 17
Now we’ll create a city in the distance. Create a new layer and press Ctrl + G to add it to a group. Name the group city and move it below the terrain layer.
Step 18
First of all be careful to put all city related layers inside the group City or else we will have a messy document. Our city will have three layers of building outlines to simulate depth. First outline will be dark and it will sit in front, second will be a little lighter than the first and sit in the back of the first outline and third will be even lighter and will sit behind the two other outlines. If you followed the step 17 you should have a single empty layer inside the City group. Select this empty layer and group it again by pressing Ctrl + G. Name the group Dark Buildings. Choose the Mosque Brush and with click a couple of times using a variety of mosque buildings to create a something like I did below.
19 comments on “How to Create Vivid Arabian Night Composite in Photoshop”
File please..
Hello
link to the download ?
This is some half-assed work indeed. The stars can been seen straight through all over the moon. The clouds are overblown to white and badly blended. This looks like the work of a troll to me. I mean come on.
There’s no link to the download file!!!
The PSD file ...
its so informative tutorial.
its really helpful tut i learn many things from this.
wtf is this shit? looks like something a kid in elementary school would draw = /
There's no link to the Clouds image... : ((
This is a really inspiring collection for all, I like it, thanks for shearing!
Thank you for the great tutorial! It has been very helpful to see a few techniques in action.
Really amazing photo manipulation tutorial.
Nice tut!
what a hard im just a highschool