

Download Lightroom presets and LUTs, absolutely free. Use the presets to add creativity and style to your photos.

Step 3: Create the Mysterious House
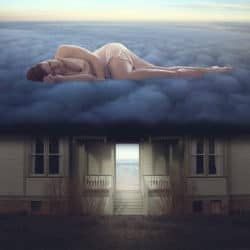
In this Step, we will be adding the eerie house. To start, Place the file “ol house 1” by JensStockCollection. Next, create a selection area around the house as shown below:

Once you’ve made the selection area around the house, Copy it and Paste it on our canvas.

Transform the house. Activate the Transform tool (Ctrl/Cmd + T), take note we don’t have to convert this image to a Smart Object since we only have to resize it once. Resize it as shown below:

The result should be something like this:

Now, let’s fix the perspective of the house.


Now, here’s a fun part! We will now make the house look like it really is on the grass. Left click on the house layer and create a layer mask.

Activate the Brush tool (B) and select this brush from the contextual menu (right click on the layer). You may use your own brush settings, but these are the recommended values:
- Brush size: 250px
- Hardness: not applicable
- Opacity: 100%
- Flow: 100%
- #: 000000

Remember, we are applying this to the layer mask so the brush’s color should be black. If you want to show something that was covered by black, paint that area with a white brush.

Right now, the house should look like it really is in the field.

Now we will be removing the door, to show what is inside this mysterious house. To remove the door, activate the Polygonal Lasso Tool (L) and create a selection area around the door then press Delete. OR if you want, you may also click on the Layer Mask and paint the door black using a Brush tool with a 100% Hardness.

Once you’re done, select all the layers of this Step and press Ctrl/Cmd + G and name this group to “House”.

Step 4: The Beach
Now, let’s open Ocean by theswedish. Select all (Ctrl/Cmd + A), copy it (Ctrl/Cmd + C) and paste it on our canvas. Put the beach layer in between the house and the field, this will make it appear inside the house.

Now, let’s resize the beach image. Activate the Transform tool (Ctrl/Cmd + T) and follow the instruction below:


Result:


Let’s make some light come out the doorway! To do that, let’s create a new layer (Ctrl/Cmd + Shift + N) above the House layer, then rename this new layer to “Light from beach”. We won’t need to put a Clipping Mask since the target is both the Beach image and the House.
19 comments on “How to Create a World Under the Sky using Photoshop”
It is very helpful tutorial and great idea for this tutorial….many many thanks a lot
Awesome! :)
Wtf?
Yup Indeed
outstanding fantastic Fab work amazing
Please re uploaded PSD file because when i click on download showing 404 error, this is best work for me i want check how did you do this
Awesome! Excellent tutorial. Thanks for sharing!
Good image, but the instructions could be better.
Thank you, this was good practice, Though I did change some things, such as the shadow beneath the clouds. I made it more of a slow fade together of the house and cloud pictures, looked more cloudlike.
Thanks for sharing this tutorial
This is nice but I agree with what the others said
I can`t understand. It is very tough
espectacular la imagen las tima que eltutorial no sea hablado
I can't understand
so was i
thank you
"Activate the Transform tool (Ctrl/Cmd + T), take note we don’t have to convert this image to a Smart Object since we only have to resize it once."
WTF? Nothing is more wrong than that
I understand that from the authors point of view but the larger issue here is that he doesn't understand the concept of non-destructing editing. The tutorial is constantly copying and pasting when it should have been imported as smart obj and stenciled with a layer mask. He knows how to use it but purposefully teaches destructing editing. Thus, leading myself to believe that the authors does not grasp the concept of non-destructing editing.
I really hate this tutorial. You start by explaining "non-destructive editing" and then everything is destructive from the 2nd page on.