

Make skin look perfect in one-click with these AI-powered Photoshop actions.

Activate the Brush tool (B) and input the following:
- Brush size: 800px
- Hardness: 0%
- Opacity: 15%
- Flow: 100%
- #: ffffff
Paint on the door way as shown below:

The result should be similar to the image shown below:

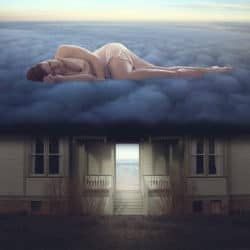
Step 5: The Cloud Roof and its Shadow
Now, prepare your eyes, we’re about to put something really amazing! We’ll be replacing the house’s roof with clouds. Open Above 3 by castock and Select All (Ctrl/Cmd + A) and Copy (Ctrl/Cmd + C) the image then Paste (Ctrl/Cmd + V) to our canvas.

Position it as shown below:


The Above 3 image is quite huge so we need to resize it. Like we did before, activate the Transform tool (Ctrl/Cmd + T) and transform it, you can press Ctrl/Cmd + 0 if you want to see the whole Above 3 image. Now, let’s enhance the color of the Above 3 image, non-destructively of course. Click on the Create New/Fill Adjustment layer button.


Click on Vibrance and input the following once it opens:


Next, open the Adjustment Layers menu once again and click on Brightness/Contrast.

Once it opens, input the following:

To make it more realistic, let’s add some shadow under the cloud image so let’s create a new layer (Ctrl/Cmd + Shift + N), and name it “Central Shadow”. Make sure that this layer is above the cloud layer.

We don’t need to put a Clipping Mask on the Clouds since we are going to paint both on the Clouds and the Roof at once. Activate the Brush tool (B) and set the following:
- Brush size: 90px
- Hardness: 0%
- Opacity: 50%
- Flow: 100%
- #: 000000


Now you change the brush settings to the following:
- Brush size: 300px
- Hardness: 0%
- Opacity: 100%
- Flow: 100%
- #: 000000
Create a New Layer (Ctrl/Cmd + Shift + N) and name it to “Whole Roof Shadow” and then paint on the following area:

Your image should be looking like this now:

Now, let’s create accentuate the cloud format ions. Create a new layer (Ctrl/Cmd + Shift + N) above the “Whole Roof Shadow” layer and then name it “Accentuate”. Activate the Brush tool (B) and input the following:
- Brush size: 125px
- Hardness: 0%
- Opacity: 50%
- Flow: 100%
- #: 000000
You may paint on any part of the bottom of the clouds, but recommended areas are shown below:


Now, let’s balance the light between the house and the clouds. Let’s darken some areas of the house which less light should be shining. Create a Gradient Adjustment layer.


Once the Gradient Adjustment box is open, click on the drop down menu with the gradients and click on the following gradient:
19 comments on “How to Create a World Under the Sky using Photoshop”
It is very helpful tutorial and great idea for this tutorial….many many thanks a lot
Awesome! :)
Wtf?
Yup Indeed
outstanding fantastic Fab work amazing
Please re uploaded PSD file because when i click on download showing 404 error, this is best work for me i want check how did you do this
Awesome! Excellent tutorial. Thanks for sharing!
Good image, but the instructions could be better.
Thank you, this was good practice, Though I did change some things, such as the shadow beneath the clouds. I made it more of a slow fade together of the house and cloud pictures, looked more cloudlike.
Thanks for sharing this tutorial
This is nice but I agree with what the others said
I can`t understand. It is very tough
espectacular la imagen las tima que eltutorial no sea hablado
I can't understand
so was i
thank you
"Activate the Transform tool (Ctrl/Cmd + T), take note we don’t have to convert this image to a Smart Object since we only have to resize it once."
WTF? Nothing is more wrong than that
I understand that from the authors point of view but the larger issue here is that he doesn't understand the concept of non-destructing editing. The tutorial is constantly copying and pasting when it should have been imported as smart obj and stenciled with a layer mask. He knows how to use it but purposefully teaches destructing editing. Thus, leading myself to believe that the authors does not grasp the concept of non-destructing editing.
I really hate this tutorial. You start by explaining "non-destructive editing" and then everything is destructive from the 2nd page on.