

Download Lightroom presets and LUTs, absolutely free. Use the presets to add creativity and style to your photos.

To make sure that you're using that, simply right click the canvas while a layer is selected and while the Brush tool (B) is activated and then click on the button highlighted below:

Then click on "Reset Brushes" from the contextual menu.

Now, that that is done input the following settings for our Brush tool (B):
- Brush size: 15px
- Hardness: 0%
- Opacity: 100%
- Flow: 100%
- #: 898989
- Zoom: 400%

Note: #: 898989 is the Brush's color. To set that, simply follow the instructions below:
The #: 898989 is the color of the Brush tool (B), so this means it is colored black. To set the brush color, follow the instructions below:

After clicking the Foreground tool, the Color Picker box would open. Once open, input the following on the # space:

Once you're done, you'd see that the Foreground Color has changed as well.
The other thing you should know is the Zoom level. The Zoom level is found in the Navigator Window - it is highlighted on the image below:

Now, let's paint with the zoom level set at 400%.

The result of that would be like this:


Next, let's fix the other part. Start by creating a new layer (Ctrl/Cmd + Shift + N) and input "Gray 2" on the name field. Next, activate the Brush tool (B) and input the following:
- Brush size: 15px
- Hardness: 0%
- Opacity: 100%
- Flow: 100%
- #: 8b8b8b
- Zoom: 400%
Now, let's paint:

The result of that would be like this:

Next, let's enhance the colors of these "gray" colors to make it look realistic. We will do this by adding white paint on top of some parts of it. Create a new layer (Ctrl/Cmd + Shift + N) and name it "White 1".
Activate the Brush tool (B) and then input the following:
- Brush size: 40px
- Hardness: 0%
- Opacity: 25%
- Flow: 100%
- #: cdd5e2
- Zoom: 200%

The result of that would be like this:


Now, let's add white paint to the other "gray" region.
Create a new layer (Ctrl/Cmd + Shift + N) and name it "White 2". Activate the Brush tool (B) and then input the following:
- Brush size: 20px
- Hardness: 0%
- Opacity: 25%
- Flow: 100%
- #: 9f9f9f
- Zoom: 200%

The result of that would be like this:


Now that we're done, select all the layers and press Ctrl/Cmd + G to group them. We would need to group them to avoid confusion on later steps. Rename this group to "Background".
Note: Renaming a group is similar to renaming a layer. Just double click on the words "Group 1" and a text box would appear. You would also notice that the layers have been hidden from view, to view them again just left click on the arrow beside the Group's name. See below:
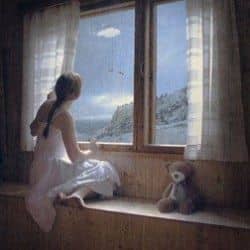
One comment on “Dreamy Photo Manipulation of a Girl Looking Out a Window”
you are professional with Photoshop and really I liked lessons so I put your website in my favorite to learn from your tutorial
thank you very much