
Turn any photo into a dot grid artwork with these Photoshop actions. You'll get great results with dots that change size. They get larger in brighter areas and smaller in darker areas. Free download available.

Before you proceed, make sure that all the selection areas have been deselected. To deselect, simply press Ctrl/Cmd + D. Now let’s input these values for our Hue/Saturation adjustment layer:
- Edit - Master
- Hue - 0
- Saturation - -65
- Lightness - 0
After doing that you’d notice that the image tone has now become a little more neutral. Now, it’s time we added the Gradient, to add some corners and to simply furnish the aesthetic value of this piece. Click on the Create New Fill layer/Adjustment layer button and pick Gradient.

Once the Gradient menu is open, input the following values on their respective places:
- Style - Linear
- Angle - -33.69
- Scale - 100%
- Reverse - Unchecked
- Dither - Unchecked
- Align with layer - Checked
Then once you’ve done that let’s pick another Gradient. See images below -


When you’re done put the Gradient layer under the Hue/Saturation layer so as to produce a neutral finish. You could put the Gradient layer above the Hue/Saturation layer just to check how Saturated that gradient is. Next, let’s change the Blending mode and Opacity of our Gradient.
- Blending mode - Linear Burn
- Opacity - 40%

We would also need to erase a region on our Gradient to give out a more luminescent image. Activate the Eraser tool (E) and use the following values:
- Brush size - 1500 px
- Hardness - 0%
- Opacity - 100%
- Flow - 100%
Note - To reduce the Hardness, right click on the image while the Eraser tool (E) is activated, then you’d see the Hardness scale, which is at default – 100%, just move the slider to the left to get 0%.

Now let’s clean up the background, activate the Clone Stamp tool (S); the Clone Stamp tool from its name clones a region and applies that area to the region of your choice. Now upon activating it, use the following values:
- Brush size - 300 px
- Mode - Normal
- Opacity - 100%
- Flow - 100%

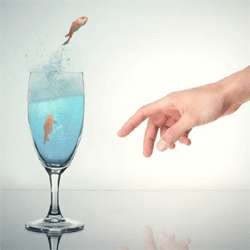
Also, we would also be removing the brand of the glass. To do that, we would need to activate the Clone stamp tool (S) once again.

That ends the first Step, but before we proceed to Step 2, let’s group these layers. To make a group, select all the layers that we have made and press Ctrl/Cmd + G and then instantly all those layers would be included in that group. To do it manually, click on the Folder button on the Layer window which is just to the right of the Create new Fill layer/Adjusment layer button then select all layers and drag them to that group. You may also do it the hard way if you wish, go to Layer > New > Group from the menu bar then drag all the layers to the group folder.
One comment on “How to Make a Fish Jump Out of Water”
Great Tutorial thx :D