

Luminar AI lets you turn your ideas into reality with powerful, intelligent AI. Download the photo editor and see how you can completely transform your photos in a few clicks.

Here is the result should be

Step 22
We are almost done with the work. In this step we will add more highlight and shadow to the scene to give it more dreamy nuance. Create another new layer between the overall adjustment and grim folder. Set the layer to linear light blending mode at 100% opacity. On this new layer, create more highlight and shadow where needed. Use dodge and burn tool to achieve this. For our inspiration, here is the layer I created when I set it to normal blending..

Here is the result will be when the layer is set to linear light blending at 100% opacity.

Step 23
Here are several final steps to finish the work. Make sure we are active on the overall adjustment folder which is the topmost position in the layer panel. Now hit Shift+Ctrl+Alt+E to stamp all the visible layers into a single new layer. I named this layer multiply. Then, go to layer > smart object > convert to smart object. This will change the new layer into a smart object. Next, go to filter > others > high pass. Set the high pass value as shown below.

Now edit the blending option of the smart filter. To achieve this, point out the cursor on the high pass filter in the layer panel and then right click on it to show smart filter dialog box. Choose edit smart filter blending option… Set it to multiply blending at 70% opacity.


Here is the result so far.

Now activate the smart filter mask thumbnail and mask the filter on parts where needed.

This is what we should have after masking the filter..

Step 24
Next, give another curves adjustment layer as shown in the screenshot. Fill this adjustment layer to 20% opacity.

Mask the curves layer .

Here is the result.

Step 25
While we are still active on the curves layer which is the topmost position in the layer panel, hit Shift+Ctrl+Alt+E to stamp all the layers again into a new single layer. Convert this layer into a smart object. Finally, give this layer a smart filter: high pass. Set this filter to overlay at 100% opacity.

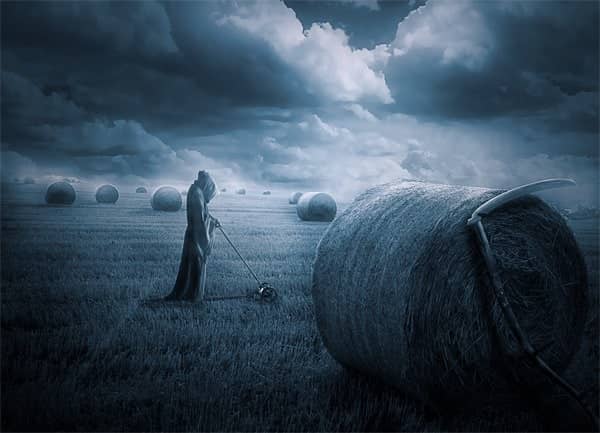
Final Results
![final result[1]](https://cdn.photoshoptutorials.ws/wp-content/uploads/2013/11/finalresult1.jpg?strip=all&lossy=1&quality=70&webp=70&avif=70&w=1920&ssl=1 "final result[1]")
Download the PSD
Tutorial by Dek Wid
 Thank you for following this tutorial! Hope that you learn something today and happy Photoshopping. Wid's side - My personal blog
- Dek Wid
20 comments on “The Grim Reapers Side Job”
this is a terrible tutorial a lot of stuff you need past experience to know where it is and if you dont it takes 4 other tutorials to do. die
Step 8 what is clipping mask for?
Good tutorial I learned a lot thanks!
Why i can't look full tutorial?
Click on page 2
Great. Thank you very very much!
Wow ... it's so elaborate with each steps perfectly depicted with screen shots... it's a great job... really like the image transformation with perfect use of layer mask, adjustment layer, blur, transform, wrap, curves, hue saturation and a lot. Excellent
Awesome! :)
Its been a while.
So nice!
you help me to create with a good idea
Great, thanks for all the helpful info!
super
Excellent Tut
Thank you very much for sharing the tutorial.
Good it is very good tutorial THX
I LIKE UR TUTORIAL
I like the tutorial but it is very dark for Christmas.
Does anyone have extra photoshop subscriptions I can have?
freeloader...