
Turn any photo into a dot grid artwork with these Photoshop actions. You'll get great results with dots that change size. They get larger in brighter areas and smaller in darker areas. Free download available.
Step 9
Now, we will be darkening the hills since the light will be coming from its back. To start, create a new layer (Ctrl/Cmd + Shift + N) and then on the name box, input "Darken Right". Next, right click on this newly created layer but make sure to put this layer above the "Right Hill" layer and then click on Create Clipping Mask from the contextual menu. See image below:
![image026[6]](https://cdn.photoshoptutorials.ws/images/stories/68c3a34a5b97_E909/image0266.jpg?strip=all&lossy=1&quality=70&webp=70&avif=70&w=1920&ssl=1 "image026[6]")
Step 10
Next, activate the Brush tool (B) but before we start, make sure that the active Brushes are the default brushes. The default Photoshop brushes are shown on the image below, if that's not what you see, then follow the instructions below:
![image027[6]](https://cdn.photoshoptutorials.ws/images/stories/68c3a34a5b97_E909/image0276.jpg?strip=all&lossy=1&quality=70&webp=70&avif=70&w=1920&ssl=1 "image027[6]")
Right click the canvas while a layer is selected and while the Brush tool (B) is activated and then click on the button highlighted below:
![image028[12]](https://cdn.photoshoptutorials.ws/images/stories/68c3a34a5b97_E909/image02812.jpg?strip=all&lossy=1&quality=70&webp=70&avif=70&w=1920&ssl=1 "image028[12]")
Then click on "Reset Brushes" from the contextual menu.
![image029[9]](https://cdn.photoshoptutorials.ws/images/stories/68c3a34a5b97_E909/image0299.jpg?strip=all&lossy=1&quality=70&webp=70&avif=70&w=1920&ssl=1 "image029[9]")
Now, that that is done input the following settings for our Brush tool (B):
- Brush size: 900px
- Hardness: 0%
- Opacity: 15%
- Flow: 100%
- #: 000000
![image030[6]](https://cdn.photoshoptutorials.ws/images/stories/68c3a34a5b97_E909/image0306.jpg?strip=all&lossy=1&quality=70&webp=70&avif=70&w=1920&ssl=1 "image030[6]")
#: 000000 - This refers to the Brush's color. To change that, simply follow the instructions below:
![image031[6]](https://cdn.photoshoptutorials.ws/images/stories/68c3a34a5b97_E909/image0316.jpg?strip=all&lossy=1&quality=70&webp=70&avif=70&w=1920&ssl=1 "image031[6]")
When the Color Picker box opens, input the following on the # space:
![image032[6]](https://cdn.photoshoptutorials.ws/images/stories/68c3a34a5b97_E909/image0326.jpg?strip=all&lossy=1&quality=70&webp=70&avif=70&w=1920&ssl=1 "image032[6]")
Step 11
Now, that all is set, we can now paint:
![image033[6]](https://cdn.photoshoptutorials.ws/images/stories/68c3a34a5b97_E909/image0336.jpg?strip=all&lossy=1&quality=70&webp=70&avif=70&w=1920&ssl=1 "image033[6]")
The result of that should be similar to this:
![image034[6]](https://cdn.photoshoptutorials.ws/images/stories/68c3a34a5b97_E909/image0346.jpg?strip=all&lossy=1&quality=70&webp=70&avif=70&w=1920&ssl=1 "image034[6]")
Step 12
Next, create a new layer above the left hill and then name this layer - "Darken Left".
Right click on the newly created layer again and then click on "Create Clipping Mask".
Activate the Brush tool (B) and then input the following:
- Brush size: 900px
- Hardness: 0%
- Opacity: 15%
- Flow: 100%
- #: 000000
Now, let's paint:
![image035[6]](https://cdn.photoshoptutorials.ws/images/stories/68c3a34a5b97_E909/image0356.jpg?strip=all&lossy=1&quality=70&webp=70&avif=70&w=1920&ssl=1 "image035[6]")
The result:
![image036[6]](https://cdn.photoshoptutorials.ws/images/stories/68c3a34a5b97_E909/image0366.jpg?strip=all&lossy=1&quality=70&webp=70&avif=70&w=1920&ssl=1 "image036[6]")
Step 13 - Create the Clouds
Now, we will be adding clouds at the bottom of the hills to give the illusion that this is a very high place. To start, create a new layer (Ctrl/Cmd + Shift + N) and name it "Clouds 1".
Activate the Brush tool (B) and then Load "Cloud brushes" by Adaae.
![image028[13]](https://cdn.photoshoptutorials.ws/images/stories/68c3a34a5b97_E909/image02813.jpg?strip=all&lossy=1&quality=70&webp=70&avif=70&w=1920&ssl=1 "image028[13]")
![image037[5]](https://cdn.photoshoptutorials.ws/images/stories/68c3a34a5b97_E909/image0375.jpg?strip=all&lossy=1&quality=70&webp=70&avif=70&w=1920&ssl=1 "image037[5]")
Make sure that after downloading the brush file, put it in the following directory: Adobe > Adobe Photoshop CS2/3/4/5 > Presets > Brushes.
Now that these brushes are loaded, right click on the canvas while the Brush tool (B) is active and then pick this brush:
![image038[5]](https://cdn.photoshoptutorials.ws/images/stories/68c3a34a5b97_E909/image0385.jpg?strip=all&lossy=1&quality=70&webp=70&avif=70&w=1920&ssl=1 "image038[5]")
Next, input the following settings for the Brush tool:
- Brush size: 2500px
- Hardness: Default
- Opacity: 100%
- Flow: 100%
- #: ffffff
![image039[5]](https://cdn.photoshoptutorials.ws/images/stories/68c3a34a5b97_E909/image0395.jpg?strip=all&lossy=1&quality=70&webp=70&avif=70&w=1920&ssl=1 "image039[5]")
Now, let's paint:
![image040[5]](https://cdn.photoshoptutorials.ws/images/stories/68c3a34a5b97_E909/image0405.jpg?strip=all&lossy=1&quality=70&webp=70&avif=70&w=1920&ssl=1 "image040[5]")
The result of that should be like this:
![image041[5]](https://cdn.photoshoptutorials.ws/images/stories/68c3a34a5b97_E909/image0415.jpg?strip=all&lossy=1&quality=70&webp=70&avif=70&w=1920&ssl=1 "image041[5]")
Step 14
Next, create a new layer (Ctrl/Cmd + Shift + N) and then name it "Clouds 2".
Activate the Brush tool (B) and then use the following brush:
![image042[5]](https://cdn.photoshoptutorials.ws/images/stories/68c3a34a5b97_E909/image0425.jpg?strip=all&lossy=1&quality=70&webp=70&avif=70&w=1920&ssl=1 "image042[5]")
Input the following settings for the Brush tool (B):
- Brush size: 1024px
- Hardness: Default
- Opacity: 100%
- Flow: 100%
- #: ffffff
Now, it's time to paint:
![image043[5]](https://cdn.photoshoptutorials.ws/images/stories/68c3a34a5b97_E909/image0435.jpg?strip=all&lossy=1&quality=70&webp=70&avif=70&w=1920&ssl=1 "image043[5]")
![image044[5]](https://cdn.photoshoptutorials.ws/images/stories/68c3a34a5b97_E909/image0445.jpg?strip=all&lossy=1&quality=70&webp=70&avif=70&w=1920&ssl=1 "image044[5]")
![image045[5]](https://cdn.photoshoptutorials.ws/images/stories/68c3a34a5b97_E909/image0455.jpg?strip=all&lossy=1&quality=70&webp=70&avif=70&w=1920&ssl=1 "image045[5]")
The result of that should be similar to this:
![image046[5]](https://cdn.photoshoptutorials.ws/images/stories/68c3a34a5b97_E909/image0465.jpg?strip=all&lossy=1&quality=70&webp=70&avif=70&w=1920&ssl=1 "image046[5]")
Step 15: Create the Background
In this step, we will be adding the sky and the other clouds. To start, let's open the stock image "Dark clouds - STOCK" by Supermalade-STOCK; once open, activate the Move tool (V) and drag this image to our canvas. Put this image below all the layers that we've made. The reason for that is for the sky would appear at the back of all the images that we would be putting.
Move and position it here:
![image047[5]](https://cdn.photoshoptutorials.ws/images/stories/68c3a34a5b97_E909/image0475.jpg?strip=all&lossy=1&quality=70&webp=70&avif=70&w=1920&ssl=1 "image047[5]")
Once the sky is on the canvas, rename it to "sky 1".
Activate the Transform tool (Ctrl/Cmd + T) next and then resize "sky 1" as shown below:
![image048[5]](https://cdn.photoshoptutorials.ws/images/stories/68c3a34a5b97_E909/image0485.jpg?strip=all&lossy=1&quality=70&webp=70&avif=70&w=1920&ssl=1 "image048[5]")
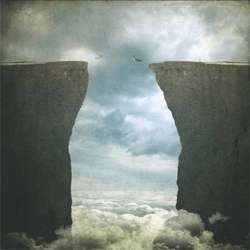
The result of that should be like this:
![image049[5]](https://cdn.photoshoptutorials.ws/images/stories/68c3a34a5b97_E909/image0495.jpg?strip=all&lossy=1&quality=70&webp=70&avif=70&w=1920&ssl=1 "image049[5]")
6 comments on “How to Create a Conceptual Image of a Couple Jumping from High Cliffs in Photoshop”
Good tutorial! Thank you!
Thanks a lot! Your tutorial is very useful and so precise, unlike many others. Very good guidance.
Too much 'grunge' for my liking but , nice idea and thanx anyway.
After completing one of your tutorials, i am reminded of the quotation below.
There are some days when I think I'm going to die from an overdose of satisfaction.
Salvador Dali
Awesome tutorial, Thanks heaps! Keep it up :)
a very good tutorial i learnt a lot thank-you