
Make skin look perfect in one-click with these AI-powered Photoshop actions.

Step 76
Click the Bokeh Texture and press V to activate the Move Tool. Left-click the image and drag the image to the main canvas and change layer name to "Texture". The result should be similar to this:

Step 77
Next, activate the Transform tool (Ctrl/Cmd +T), then while the "texture" layer is selected and then resize it as shown below:

Step 78
Make 3 duplicates (Ctrl/Cmd+J) of the texture layer and arange them see as below :
 \
\
Step 79
Select all layers and marge (Ctrl+e) them and name it "texture" :

change the layer mode to "soft light" :

The result should be similar to this:

Step 80
Activate the Eraser tool
- Brush size: 2000px
- Hardness: 0%
- Opacity: 40%
- Flow: 100%

The result should be similar to this:

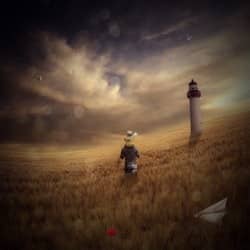
Final Results
![final-results[1]](https://cdn.photoshoptutorials.ws/images/stories/90c1e7cbba8f_E439/final-results1.jpg?strip=all&lossy=1&quality=70&webp=70&avif=70&w=1920&ssl=1 "final-results[1]")
Finally, when you save in the JPEG format, it is advisable to save it in the highest quality which is 12. Through this tutorial we have learned so many advance tips of doing a art work.always go with Adjustments from layer palette. Always try to avoid using erase tool in spite of erase tool use layer mask. Hope you all like my tutorial and learn something from this.
Tutorial by Vik Aadi
 I'm a freelance visual artist from india.I am a fan of Surreal artworks, and I would like to share the process on how I do mine. I hope you'd enjoy creating this tutorial and I hope this would help you in whatever you're doing. Anyway, thank you for visiting this page and using my tutorial, if you want to see more of my art works,and if you have any kind of project for me or any kind of art colobration in your mind give me a shout at my Deviantart and Facebook.
- Vikas Singh Adhikari (Vik aadi)
24 comments on “How to Create a Mystical Father and Son Scene in Photoshop”
Wow, these are really creative scene! I like your post,thanks for sharing............
thanks,its a great tutorial, and here is my result
http://dedicahmad.deviantart.com/art/Save-The-Mosque-2-437502588?q=gallery%3Adedicahmad%2F47846098&qo=17
I like your version more 🙂
Loved the tut and I posted it in my digital network for others to use.
Great tutorial and very easy to follow.
Thank You
It's an interesting finished picture but I really think that individually color correcting everything is very time consuming.
Group certain elements then run an adjustment layer.
I will make this homework for my student, thanks.
muito obrigado pelos seus tutoriais, tenho feito grandes trabalhos e aprendido muito.... continua com o excelente trabalho e dedicação que ten tido..... nota 10
Where i found that ???
@ArwaMohammad is not in distort, its above that.
@Big Denos oh , i found it
Thaanx :)
@ArwaMohammad Go to Filter, Lens correction, or just press Shift + Ctrl + R on your keyboard :)
@JohnnySteel1 Thaaaaaanx :")
i cann't found the ( Lens Correction ) in photoshop 6 :(
Thanks for this tutorial it inspired me to use some of my own photos including my Daughter inlaw and Granddaughter, And for all those peeps here saying image has been deleted etc, just use your imagination, theres not a lot of point following this tutorial down to a t, as i said before learn from it and use your imagination. here is my version, [IMG]http://i569.photobucket.com/albums/ss134/chukkamental/amieevie.jpg[/IMG]
@JohnnySteel1 it's cool and surreal
Where can I tare Field picture? It's not available anymore!
How admirable. Thanks.
Nice photo tutorial!! really nice piaemakku
The grass field has been deleted
nice photo manipulation.....great work! keep it up...
Great work i love the idea, thank you very much for sharing
How would I add a monkey riding on a humpback whale to the sky?
What's a f&^%$#$ lighthouse doing in the middle of a field... on hills. Should've used a windmill.
I think you're failing to understand the concept of surrealism.....