
Make skin look perfect in one-click with these AI-powered Photoshop actions.


Step 6
After applying the filter, duplicate the layer of the wall and change the blend to Multiply 100%. Ctrl + E to merge the layers of the wall and name: wall.

Step 7
On the keyboard: CTRL + U to open the Hue / Saturation box, saturation -35.
On the keyboard: Ctrl + L for Levels box, leave at 0.80.
The wall begins to darken.

Step 8
Beneath all the layers we will open the city's image. On the keyboard: W to select Magic Tool > Tolerance 32, let's click in the sky, the tones are similar, it will fill the entire sky. Delete.

Step 9
Open the stock of new sky, and enter the layer behind the buildings to assemble the background.

Step 11
In the layer of the buildings, go to Image> Adjustments> Brightness / Contrast and leave like this:
- Brightness: -150
- Contrast: -50

Step 12
Duplicate the layer, change the blend to Multiply 50%.
Ctrl + E to merge the layers into one.
See how the buildings should be.

Step 12
Go in the sidebar and select the Dodge Tool in Highlights > Exposure 100% and give a light at the top of the buildings to brighten a little.

Step 13
Go to Image> Adjustments> Photo Filter and apply the Cooling Filter (LBB) in 25%. You will see that the buildings were already in blue. Reduce the layer opacity to 70%.

Step 14
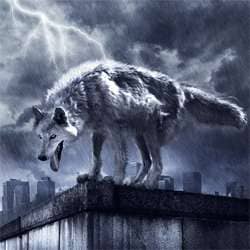
In the wolf will create a clipping mask layer for saturation and contrast.
For those who do not know how to create, I will explain in detail: Go on the symbol Adjustments Layers (represented by a circle half white half black) Hue / Saturation
- Saturation -75

Step 15
After applying this step, you will see that the effect is applied to every image, but do not want that, we want the effect only in the wolf, that's where the clipping mask enters. In layer Hue / Saturation, click the right mouse button, go to "create clipping mask", and you will see that the effect will be restricted only to the layer below it, in this case, the wolf, which was the layer in which we wanted to apply the effect. Then, whenever you want to apply an effect, whatever it is, only one object, the clipping mask makes it easy for you. Let's do the same procedure now with Brightness / Contrast. Go to the symbol of Adjustments Layers again, open and choose Brightness / Contrast.
5 comments on “How to Create a Photo Manipulation of a Wolf in Stormy Weather”
please i need step by step PDF Photoshop manipulation design tutorials
The Cloud Pic Cant Be Downloaded
refresh link with clouds
it was nice exprenice
The Cloud Pic Cant Be Downloaded