
Luminar AI lets you turn your ideas into reality with powerful, intelligent AI. Download the photo editor and see how you can completely transform your photos in a few clicks.
- Color Levels: -27, +50, +49
- Tone Balance: Midtones
- Preserve Luminosity: Checked

Once finished, lower the opacity of the “fish” layer to 60% to totally blend in with the water.

STEP 8: Add the woman
Now, let’s add our other subject – the woman with a frame held in front of her head. Open the image “Model 36” by night fate stock. We would need to remove her from her background, so activate the Polygonal Lasso tool (L) and create a selection area around the model. See image below:

Once you’ve done that, activate the Move tool (V) and drag the model to our canvas. Once there, rename this layer to “model”. Next, we’re going to transform and resize the model. See image below on what size she should be resized to:

Now, let’s remove the model’s face and upper body which is within the frame. Activate the Polygonal Lasso tool (L) and create a selection area within the frame. See image below:

The result should be similar to this:

Now, let’s fix her lower body to make it blend in with the water. Activate the Polygonal Lasso tool (L) and then follow the instructions shown below:

Once you’re done with that, just erase the original lower body. Now, let’s adjust the color of the model’s lower body. Select the duplicated layer (lower body) and then go to Image > Adjustments > Color Balance and input the following:
- Color Levels: -27, +50, +49
- Tone Balance: Midtones
- Preserve Luminosity: Checked
Next, change the lower body’s opacity to 70%. The result should be similar to this:

Now let’s erase the legs to make it look like it really is underwater. Activate the Eraser tool (E) and input the following:
- Brush size: 400px
- Hardness: 0%
- Opacity: 75%
- Flow: 100%
Use the Eraser tool as instructed below:

The result should be similar to the following:

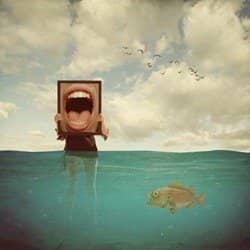
Step 9: Create the mouth
Now we’re going to add the mouth which will act as the picture inside the frame. To start, open “Mouth Detail Front” by Della Stock. Now that it is open, activate the Move tool (V) and then drag the mouth to our canvas. Position it below the “model” layer. Once there, rename it to “Mouth”. Next, we will fit this into the frame and to do that we would need to resize this layer. Activate the Transform tool and resize it as shown below:

After you’ve done that, select the mouth layer and then adjust its Brightness and Contrast. Go to Image > Adjustments > Brightness/Contrast and set the following:
5 comments on “How to Create a Retro Surreal Photo Manipulation using Photoshop”
I know this tutorial is an old tutorial and that some of the stock photos are gone, but I really like the tutorials on this website by Michael Manalo. I can follow along using other stocks and the artworks are beautiful.
It would have been much more helpful as a beginner if I could see what the layers looked like on the right side of the screen. As it was, the lasso tool at the very beginning working with the water lost me. Please don't assume you're dealing with experts when directing these tutorials!
koji si ti bumbar?????? ke je slika ud une pičke???? mamu ti jebem!!!
The pic of the woman got deleted :(
I'm beginner , so I'm stuck on sky. When I put them on main picture (canvas) they are so small , and when I resize sky, resolution is changed and it looks really ugly. Any help ?